Ontology_Mapping_Installation_Guide_v1-1.doc
Informatics for Integrating Biology and the Bedside
.

i2b2 Installation Guide
Ontology Mapper (MAP) Cell
|
Document Version: |
1.1.0 |
|
I2b2 Software Version: |
1.7.01 |
Table of Contents
2.1 Installing the Ontology Mapper (MAP) Cell
2.1.1 Download and Extract Distribution
2.1.3 Deploy edu.harvard.i2b2.ontology.mapper
2.2 Ontology Mapper (MAP) Cell Sanity Test via the i2b2Workbench
2.2.1 Installing Mapper plugins to workbench.
2.2.2 Mapping project requirements.
2.2.3 Configure the i2b2Workbench to communicate with your MAP cell.
2.2.4 Configure the Ontology Mapper (MAP) user in i2b2 admin
2.2.5 Launch the i2b2Workbench
2.2.5.1 Open the MAPPING TOOL View in the Workbench
2.2.5.2 Open the MAPPED TERMS Viewer in the Workbench
Document Management
|
Revision Number |
Date |
Author |
Description of change |
|
1.0.0 |
08/07/14 |
Lori Phillips |
Created 1.0 version of document. |
|
1.1.0 |
03/18/15 |
Lori Phillips |
Updated for v1.1 i2b2 MetaMap Demo project |
About this Guide
Informatics for Integrating Biology and the Bedside (i2b2) is one of the sponsored initiatives of the NIH Roadmap National Centers for Biomedical Computing ( http://www.bisti.nih.gov/ncbc/ ) .
One of the goals of i2b2 is to provide clinical investigators broadly with the software tools necessary to collect and manage project-related clinical research data in the genomics age as a cohesive entity; a software suite to construct and manage the modern clinical research chart. This guide with the provided source code will help you deploy the i2b2 MAP cell.
This cell requires a working, configured hive with, at a minimum, an 1.7 Ontology cell and a PM cell. This document presumes that all required data elements for a Mapping project have been configured and installed. See Mapping cell Data installation document for details.
The following outlines the steps to download and extract the MAP server source code to a target area.
Steps :
- Set up a target distribution_directory.
- Extract the MAP server distribution code (edu.harvard.i2b2.ontology.mapper, edu.harvard.i2b2.server-common and edu.harvard.i2b2.xml ) into the target distribution_directory.
2.1.2 Stop Services
In order to install the MAP cell properly it is important that certain services are not running. These services are further defined below.
2.1.2.1 JBoss
Verify JBOSS is not running.
- cd $JBOSS_HOME/bin/
- jboss-cli.sh --connect :shutdown
2.1.3 Deploy edu.harvard.i2b2.ontology.mapper
Steps :
- cd distribution_directory/edu.harvard.i2b2.ontology.mapper
- Edit the build.properties file and set jboss.home and axis2.war.name properties
jboss.home=YOUR_JBOSS_HOME_DIR
axis2.war.name=i2b2.war
- Edit the etc/spring/ontology_mapper_application_directory.properties file and specify a location for the application properties directory. This location can be anything you desire but must be a directory path that your Linux user has access permission granted.
edu.harvard.i2b2.ontology.mapper.applicationdir=YOUR_JBOSS_HOME_DIR /standalone /conf iguration /ontologymapperapp
- Edit the etc/spring/ontology_mapper.properties file and set the database and project management properties .
- Set the metadata bootstrap database schema name to the location of the ONT_MAP_DB_LOOKUP table.
# # # # # # # # # # # # # # # # #
# METADATA schema name
# # # # # # # # # # # # # # # # #
ontology.mapper.bootstrapdb.metadataschema= i2b2hive
- Set the Project Management Property settings: change the host and port settings.
- Note the new address for the jboss-based PM Service
ontology.mapper.ws.pm.url= http://localhost:9090/i2b2/ services /PMService/getServices
ontology.mapper.ws.pm.webServiceMethod= REST
# Flag to bypass project management cell
ontology.mapper.ws.pm.bypass= false
ontology.mapper.ws.pm.bypass.role= ADMIN
ontology.mapper.ws.pm.bypass.project= Demo
- Set the METADATA delimiter (backslash) setting.
ontology.mapper.terminal.delimiter=true
- If set to ‘ true ’, this parameter adds a backslash automatically to the metadata fullpath name if it does not already exist.
5.Edit the etc/jboss/ontmap-ds.xml and configure your data sources.
- OntologyMapperBootStrapDS points to the data source for your ONT_MAP_DB_LOOKUP table.
- Any additional data source specified in the lookup table must be specified here as well (shown below as “OntologyMapperDemoDS” for project Demo). This is the same data source that is referred to in the ONT_MAP_DB_LOOKUP table. Edit it accordingly to point to your newly configured datasource.
- Data source samples for postgresql, sqlserver and oracle are provided in ontmap-ds.xml. Copy and modify the samples in ontmap-ds.xml as needed to create the two data sources shown below. Comment out or remove any unused samples.
Example for oracle :
<!-- sample oracle OntologyMapperBootStrapDS -->
<datasource jta ="false" jndi -name="java:/OntologyMapperBootStrapDS"
pool-name="OntologyMapperBootStrapDS" enabled="true" use- ccm ="false">
<connection- url >jdbc:oracle:thin: @localhost :1521: xe </connection- url >
<driver-class>oracle.jdbc.OracleDriver</driver-class>
<driver>ojdbc6.jar</driver>
<security>
<user-name>i2b2hive</user-name>
<password> hive_pswd </password>
</security>
<validation>
<validate-on-match>false</validate-on-match>
<background-validation>false</background-validation>
</validation>
<statement>
<share-prepared-statements>false</share-prepared-statements>
</statement>
</datasource>
<!-- sample oracle project data source -->
<datasource jta ="false" jndi -name="java:/OntologyMapperDemoDS"
pool-name="OntologyMapperDemoDS" enabled="true" use- ccm ="false">
<connection- url >jdbc:oracle:thin: @localhost :1521: xe </connection- url >
<driver-class>oracle.jdbc.OracleDriver</driver-class>
<driver>ojdbc6.jar</driver>
<security>
<user-name>i2b2mapdata</user-name>
<password> mapdata_pswd </password>
</security>
<validation>
<validate-on-match>false</validate-on-match>
<background-validation>false</background-validation>
</validation>
<statement>
<share-prepared-statements>false</share-prepared-statements>
</statement>
</datasource>
Example for PostgreSQL :
< datasource jta = "false" jndi-name = "java:/OntologyMapperBootStrapDS"
pool-name = "OntologyMapperBootStrapDS" enabled = "true" use-ccm = "false" >
< connection-url > j dbc:postgresql:// localhost :5432/i2b2 </ connection-url >
< driver-class > org.postgresql.Driver </ driver-class >
< driver > postgresql-9.2-1002.jdbc4.jar </ driver >
< security >
< user-name > i2b2hive </ user-name >
< password > hive_pswd </ password >
</ security >
< validation >
< validate-on-match > false </ validate-on-match >
< background-validation > false </ background-validation >
</ validation >
< statement >
< share-prepared-statements > false </ share-prepared-statements >
</ statement >
</ datasource >
< datasource jta = "false" jndi-name = "java:/OntologyMapperDemoDS"
pool-name = "OntologyMapperDemoDS" enabled = "true" use-ccm = "false" >
< connection-url > j dbc:postgresql:// localhost :5432/i2b2 </ connection-url >
< driver-class > org.postgresql.Driver </ driver-class >
< driver > postgresql-9.2-1002.jdbc4.jar </ driver >
< security >
< user-name > i2b2mapdata </ user-name >
< password > mapdata_pswd </ password >
</ security >
< validation >
< validate-on-match > false </ validate-on-match >
< background-validation > false </ background-validation >
</ validation >
< statement >
< share-prepared-statements > false </ share-prepared-statements >
</ statement >
</ datasource >
Example for SQL Server
< datasource jta = "false" jndi-name = "java:/OntologyMapperBootStrapDS"
pool-name = "OntologyMapperBootStrapDS" enabled = "true" use-ccm = "false" >
< connection-url > jdbc: sqlserver:// localhost :1433 </ connection-url >
< driver-class > com.microsoft.sqlserver.jdbc.SQLServerDriver </ driver-class >
< driver > sqljdbc4.jar </ driver >
< security >
< user-name > i2b2hive </ user-name >
< password > hive_pswd </ password >
</ security >
< validation >
< validate-on-match > false </ validate-on-match >
< background-validation > false </ background-validation >
</ validation >
< statement >
< share-prepared-statements > false </ share-prepared-statements >
</ statement >
</ datasource >
< datasource jta = "false" jndi-name = "java:/OntologyMapperDemoDS"
pool-name = "OntologyMapperDemoDS" enabled = "true" use-ccm = "false" >
< connection-url > jdbc: sqlserver:// localhost :1433 </ connection-url >
< driver-class > com.microsoft.sqlserver.jdbc.SQLServerDriver </ driver-class >
< driver > sqljdbc4.jar </ driver >
< security >
< user-name > i2b2mapdata </ user-name >
< password > mapdata_pswd </ password >
</ security >
< validation >
< validate-on-match > false </ validate-on-match >
< background-validation > false </ background-validation >
</ validation >
< statement >
< share-prepared-statements > false </ share-prepared-statements >
</ statement >
</ datasource >
- Run ant –f master_build.xml clean build-all deploy
from the destination_directory/edu.harvard.i2b2.ontology.mapper project
2.1.4 Start Services
2.1.4.1 Start JBOSS
To start JBOSS run the following:
$ JBOSS_HOME /bin/standalone.sh –b 0.0.0.0 &
2.1.4.2 Web Service
The following are the steps to verify the web service is running.
- In a browser, check the following URL:
http:// yourHost :9090/i2b2/services/listServices
- Verify OntologyMapperService is listed as active.
2.2 Ontology Mapper (MAP) Cell Sanity Test via the i2b2Workbench
2.2.1 Installing the workbench.
Locate and unzip the accompanying Windows or Mac workbench with the mapping tool plugins pre-installed. These are preconfigured to log into the MetaMap Demo instance on Amazon.
2.2.2 Mapping project requirements.
While it is permissible to assign mapping capability to an existing i2b2 project, it is advisable to set up different projects for different mapping tasks. For example set up one project for Diagnosis mapping, another for Procedures mapping, etc. In this manner, you may have two mapping efforts going on in parallel.
Any mapping project requires a set of mapping tables to be configured and populated. Consult the Mapping Data installation document if this has not been done yet.
Also, the mapping plugins require that users have EDITOR role. Assign a user to your mapping project with EDITOR role using the administration tool. See section 2.2.5 for details.
2.2.3 Configure the i2b2Workbench to communicate with your MAP cell.
Cell configuration is addressed in the Project Management (PM) Cell installation and set up. While the steps are described below, p lease refer to this document if you run into problems.
To configured the MAP cell go to the administration module site http:// your_ host/ admin . Once logged on, select “ Manage Cells ” navigation tab. When adding MAP cell parameters for the first time click on the ‘Add New Cell’ button.

Cell Id: MAP
Cell Name: Ontology Mapper cell
Cell URL: http://host:port/i2b2/services/OntologyMapperService/
Project Path: /
Method: REST
Click on ‘Save’
Once the Ontology MapperCell has been configured it will be listed as an existing, registered cell:
- To verify cell data, click on the cell name (Ontology Mapper Cell) in the navigation tab..
- To edit the cell data, click on the field you want to edit. Click on “ Save ” to save the changes you have made.
2.2.4 Configure the Ontology Mapper (MAP) user in i2b2 admin
The mapping plugins require that users have EDITOR role. Assign a user to your mapping project with EDITOR role using the administration tool.
Go to Manage Projects
Click on your project
Click on existing user.
Click on Roles
Check off Editor under Custom Path heading.
When assigning a new user to this project, be sure to check off Editor when setting Roles.
2.2.5 Launch the i2b2Workbench
The following outlines the steps to log into the i2b2 Workbench.
- Go to the location (folder) in which the i2b2 Workbench and Mapping plugins were installed.
- If not previously done, edit the i2b2Workbench.properties file to point to the location of your PM cell.
i2b2. 2 = YourSite ,REST,http:// jbossHost :port/i2b2/ services /PMService/
where YourSite is your domain.
To get to the properties file on the mac, open the workbench folder in Finder, right click on the i2b2Workbench icon, select “Show Package Contents”. Open the Contents folder and then the MacOS folder; you will then see the i2b2Workbench.properties file.
- Double click on i2b2Workbench.exe .
- The Login dialog box will open. Shown below is the Mapping Demo site.
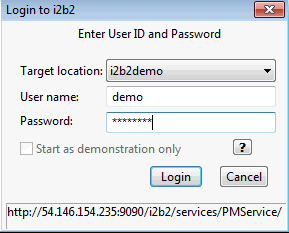
- Select your target location (YourSite)
The URL that appears on the bottom of the login box should match the location of your PM service. The one shown here is preconfigured in the properties file and points to the MetaMap demo installation on Amazon.
- Enter your User name (ID) and Password .
- The Mapping plugins require that the user logging in to this project has Editor role.
- The Choose a Project dialog box will open.
- The project dialog box will only appear if you have access to multiple projects.
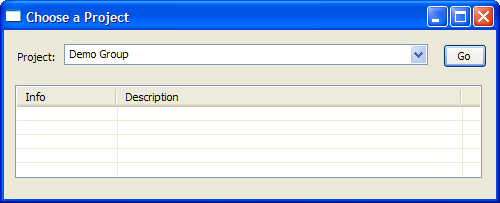
- Select the Mapping project you want to log into.
- The desktop of the i2b2 Workbench will open.
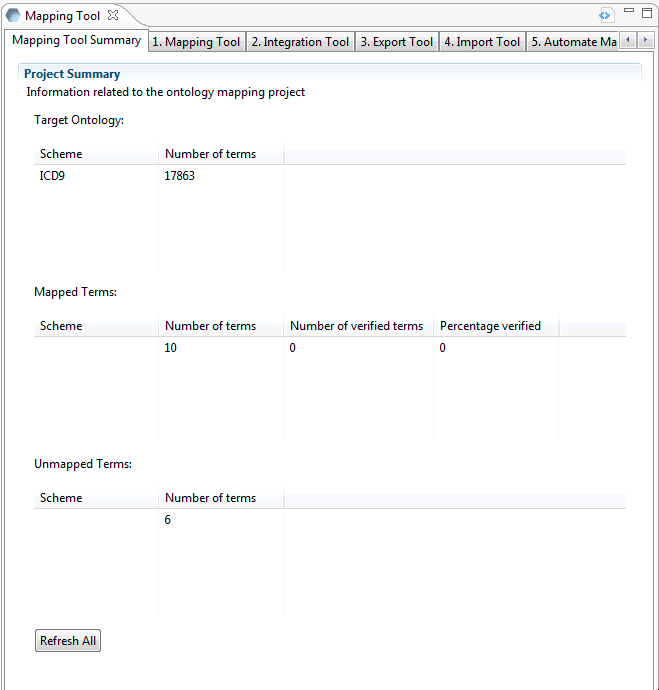
2.2.5.1 Open the MAPPING TOOL View in the Workbench
If all is configured properly, you will be greeted with Mapping Tool Summary page.
If the workbench does not open directly to this view, select Window -> Show view -> Other -> Mapping category -> Mapping Tool
It is recommended to close all other views (Previous Queries, Query Tool, Workplace, Timeline, etc). Alternatively you can double click on the Mapping Tool view tab and bring it into focus. To go back to original layout, double click on the tab again. Map demo data provided on the Mapping Demo site is shown in the summary below.
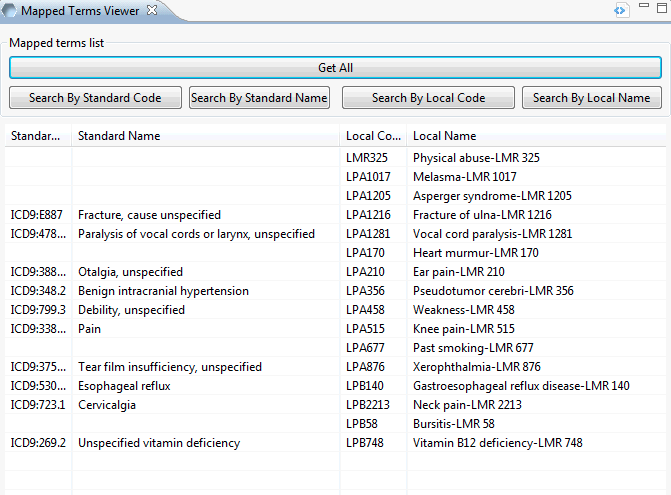
2.2.5.2 Open the MAPPED TERMS ViewER in the Workbench
If the workbench does not show the tab for this view, select Window -> Show view -> Other -> Mapping Viewer category -> Mapped Terms Viewer. You may double click on the tab to bring it into focus. To go back to original layout, double click on the tab again.
Click on Get All button.
2.2.6 Possible problems
The Mapping plugin tools communicate with both the PM cell and the MAP cell. Error messages may appear in view window as a result of mis-configured PM or MAP cells.
1. Ontology Mapper cell is unavailable
The possible cause for this error message may be one of the following:
- Ontology Mapper cell address in the PM webclient is incorrect.
- See the section labeled “ Configure the i2b2Workbench to communicate with your MAP Cell ” (section 2.2.4) to verify the Ontology Mapper cell address is correct.
- Ontology Mapper cell may be down. Follow these steps to check the status of the MAP cell.
- In a browser, check the url http:// yourHost : port /i2b2/services/listServices
- Verify that OntologyMapperService is listed active.
3 Remote server is unavailable
The possible cause for this error message may be one of the following:
- Server may be down. Follow these steps to check the status of the server.
- In a browser, check the URL http:// yourHost : port/ i2b2/services/listServices
- Verify that OntologyMapperService is listed as active.
4 PM service is not responding
The Project Management Cell is down or its address was not configured properly in the following sections:
- Section : Deploy edu.harvard.i2b2.ontology.mapper(section 2.1.3)
Step 4 : Edit the etc/spring/ontology_mapper.properties file
5 Database error
The possible cause for this error message may be one of the following:
- Problem connecting to the database.
- Map_table_access data may be incorrect. The datasource specified in map_table_access should match the one specified in ontmap-ds.xml. Verify configuration parameters in the following sections:
- Section : Deploy edu.harvard.i2b2.ontology.mapper (section 2.1.4)
Step 3 : Edit the etc/spring/ontology_mapper_application_directory.properties file
Step 4 : Edit the etc/spring/ontology_mapper.properties file
Step 5 : Edit the etc/jboss/ontmap-ds.xml
6. Display indicates user is not valid. Check that user has been given EDITOR role for this project.
7. Mapping tool display opens but the unmapped terms table is empty. This can occur if the destination_fullname field for the project_ont_mapping table is set to “” (empty string) instead of null. Be sure to set the destination_fullname field to null for unmapped terms.
License
The i2b2 source code is licensed under the i2b2 Software License Software. This includes but not limited to all code in the edu.harvard.i2b2.* package namespace.