Mapping_Tools_Users_Guide_v1-1.doc
Informatics for Integrating Biology and the Bedside

User Guide
Ontology Mapping Tools
|
Document Version: |
1.2 |
|
i2b2 Software Version: |
1.1 |
Table of Contents
2. INSTALLATION and PREPARATION
3.2 Familiarize yourself with the Mapping tool
Document Management
|
Revision Number |
Date |
Author |
Description of change |
|
1.0 |
08/05/14 |
Lori Phillips |
Original document |
|
1.1 |
01/13/15 |
Lori Phillips |
Export tool tab options |
|
1.2 |
03/09/15 |
Lori Phillip |
Automate mappings tab |
Abstract
This is a User’s Guide for the Ontology Mapping Tools. It is meant to be used in conjunction with the Mapping Tools Overview power point slides.
The use case shown in this guide represents the map demo data that is provided in both the data package. It does not match the use case shown in the overview slides.
1.1 Prerequisites
A working 1.7 i2b2 hive instance is required. It is recommended that you create a project for mapping purposes but it is not mandatory. Any user assigned to and expected to use the mapping tools must have EDITOR role privileges.
Refer to the i2b2 Ontology Mapper Data Installation Guide.
Please consult the Ontology Mapping Installation Guide to install and configure the MAP cell, workbench and plugins.
Double click on the i2b2workbench application.
The first time you start up the workbench you will see a welcome screen. Click on the arrow.
The views you need to perform mapping tasks (those shown in the Overview slides) can be brought to focus by selecting:
Windows->Show view->Other-> Mapping category->Mapping Tool
and
Windows->Show view->Other->Mapping Viewer category->Mapped Terms Viewer
It is recommended to close all other views (Previous Queries, Query Tool, Workplace, Timeline, etc). Map demo data provided on the vm is shown in the summary below. For ease of use, arrange your workbench window as shown.
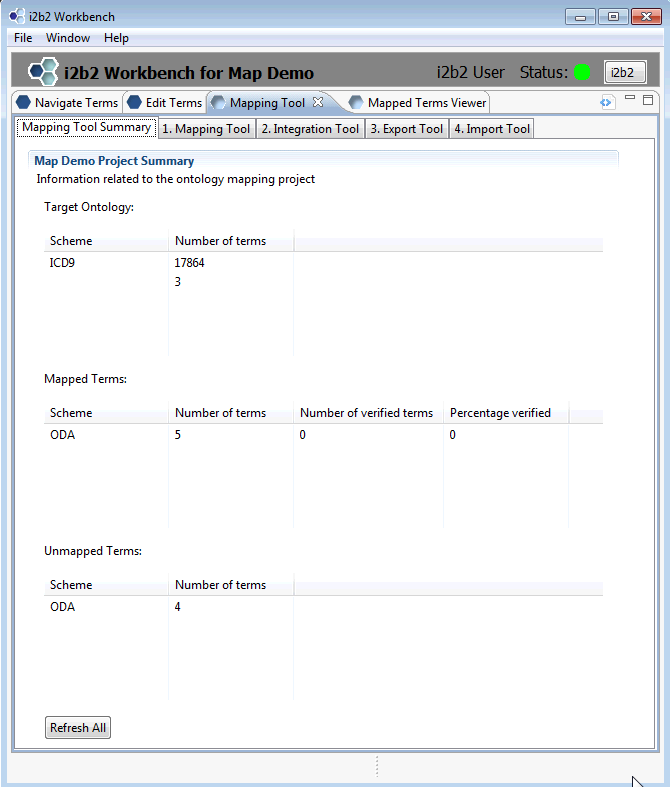
3.2 Familiarize yourself with the Mapping tool
The Map demo data package on the VM and provided in the data package is very small. When you click on tab 1.Mapping Tool, you will see a navigation tree on the left and a list of 4 unmapped terms on the right. Both mapped and unmapped Diabetes-related terms are in this demo package.
To find the Mapped terms traverse down the tree as follows:
ICD9CM->Diseases and injuries->Endocrine,nutritional and metabolic diseases…->
Diseases of other endocrine glands -> Diabetes mellitus
-OR-
Type Diabetes in the Jump To term field and select ‘Diabetes mellitus’ in the pop up window. The tree will open directly to that term.
Open some of the folders under Diabetes mellitus and you will see mapped terms in bold prefaced by a purple flag.
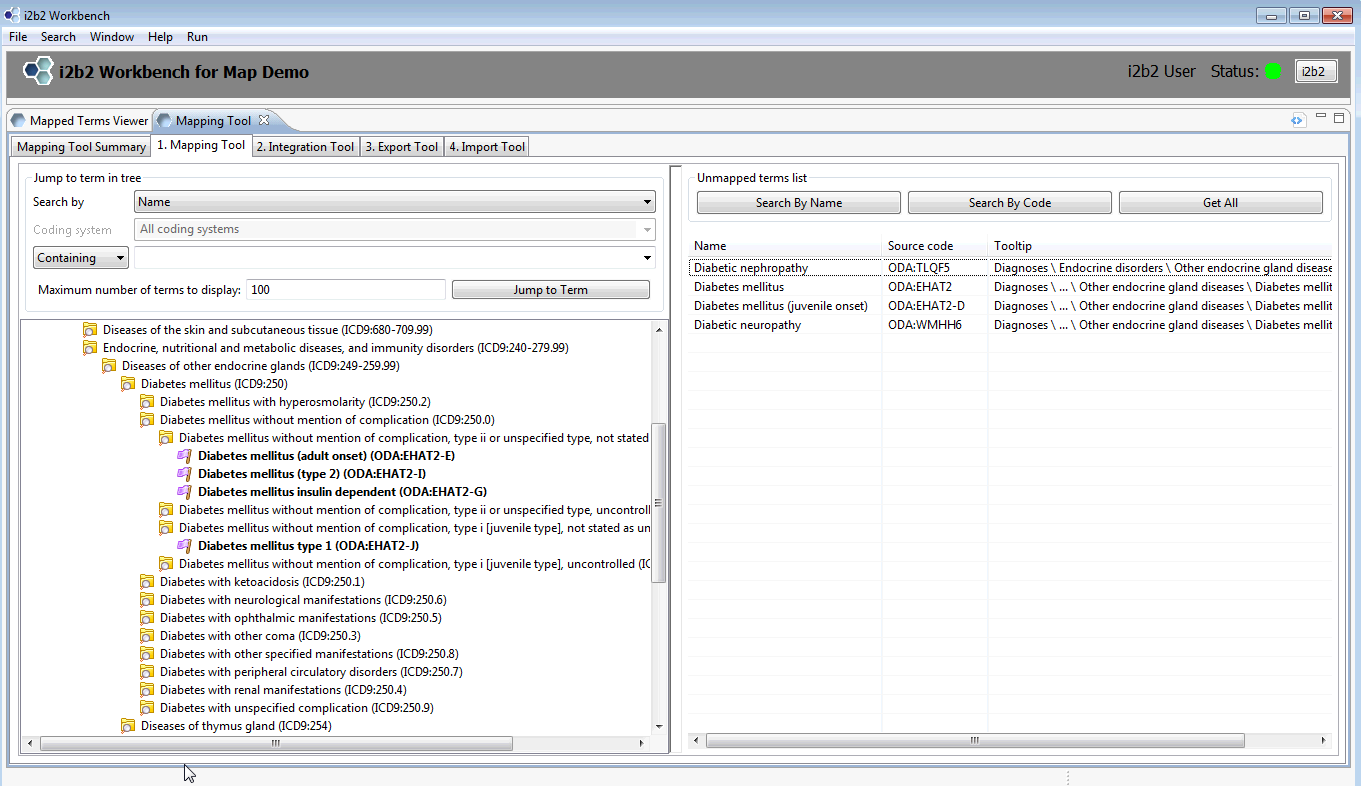
As shown in the Overview slides, the mapped terms can be moved, copied and pasted, mapped, unmapped, verified, etc. Practice mapping some of the unmapped terms and play with the functions. Bold face concepts are unverified mappings; once they are verified they change to regular type face.
One thing to remember in this exercise is that we are not equating or mapping terms in the true sense; i.e. we are not necessarily saying the terms are equal. We are placing the terms in their proper hierarchical order, such that if we selected the parent term for a query, the mapped term would be included.
3.2.1 Integration Tool tab
Once mappings are completed and have been verified, the next step is to merge the mapped terms into your destination ontology located in the INTEGRATION table.
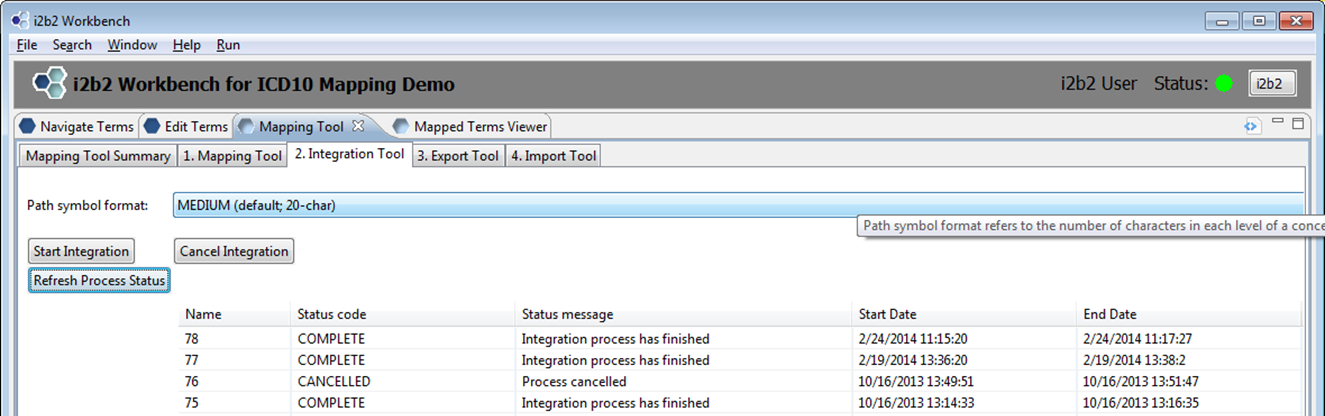
The lone input to this process is the choice of a path symbol format (S, M, L). A sample path symbol is highlighted below. It can be Short (4 chars), Medium (20-chars) or Long (32 chars). The example below is Long.
\i2b2\Diagnoses\Metabolic and immunity disorders (270-279)\
(277) Other and unspecified disor~ \(277-0) Cystic fibrosis\
To activate the integration process, simply click the Start Integration button and then Refresh Process Status until the status displays complete as shown below.
- Note: There is an additional PCORI-specific step that has to performed to update the PCORI_BASECODE for all mapped terms. We will be releasing a separate script/tool to perform this task.
3.2.2 Export Tool tab
When the integration process is complete you may export your merged ontology as a delimited text file. This file may then be used to populate a metadata table. The data exported by this tool is the INTEGRATION table content.
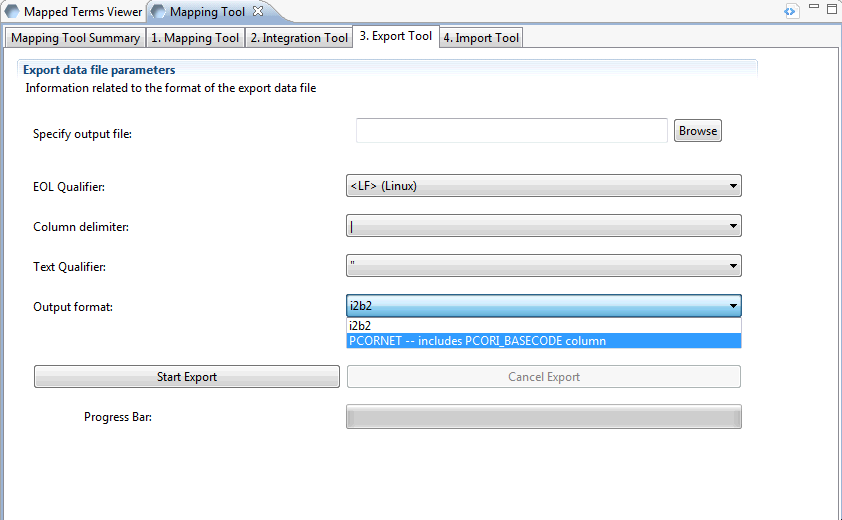
The input parameters on this screen are output file name, EOL (end-of-line) qualifier, column delimiter, text qualifier and output format. Be sure to set the output format to PCORNET. This will ensure that the PCORI_BASECODE column is populated. All other inputs are up to you.
Begin the export process by clicking on ‘Start Export’. The progress bar will let you know when the process is complete. The resulting output file may then be loaded into an i2b2 metadata table.
3.2.3 Import Tool tab
The Import tool may be used to import local data into the project_ont_mapping table. The data must be entered in manually so it is intended for small data sets. All entered data will appear in the unmapped terms table.
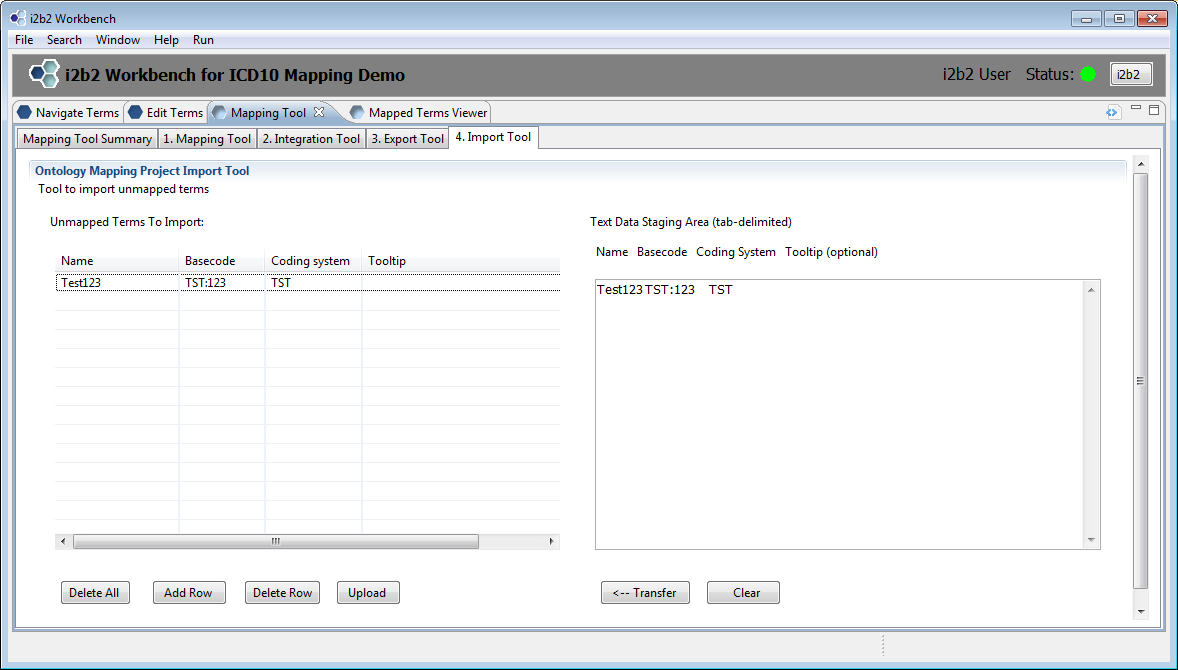
Enter data into either the table on the left directly or into the staging area on the right. The staging area is provided for those cutting and pasting tab-delimited data from another source. If using the staging area, click on the Transfer button to move the data into the table on the left.
Once the table on the left is populated to your satisfaction, click on the ‘Upload’ button. Refresh the Unmapped Terms table on tab 1 by clicking on the ‘Get All’ button. The terms you just uploaded will appear.
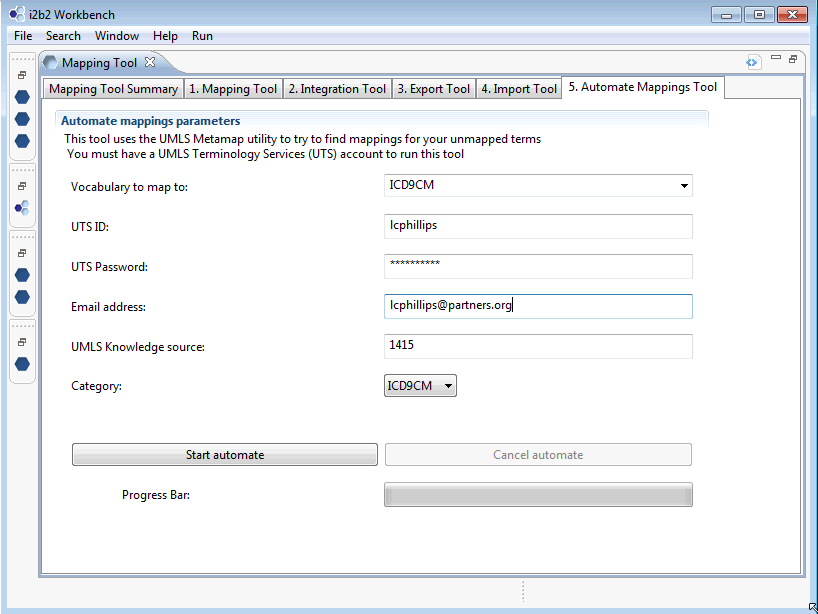
3.2.4 Automated Mappings tab
The automated mappings tab is a new feature that utilizes the UMLS MetaMap functionality. It requires that the user obtain an UMLS Terminology Services (UTS) account. This feature is intended for mappings that do not have third party mappings available and that may be too cumbersome to map manually A good example would be a case of local diagnostic terms that need to map to ICD9.
Insert the terms to be mapped into the project_ont_mapping table, preserving the source name and basecode fields at a minimum. The source tooltip, coding_system and fullname fields are desirable but not required.
- Note: Due to processing constraints on the UTS server there appears to be a limit on the number of terms that can be mapped in one session. It is recommended that you do not exceed 2000 terms in the project_ont_mapping table.
Start by choosing the UMLS vocabulary you wish to map to. In the example below, we choose ICD9CM. The next three fields pertain to your UTS account. The field UMLS Knowledge Source refers to the version of the UMLS vocabulary you wish to map to. Enter ‘14’ for Version 2014AA or ‘1415’ for Version 2014AB. Likewise you would choose ‘13’ for Version 2013AA or ‘1314’ for Version 2013AB, etc. The category field is the root level category on the Mapping Tool tab page that you are mapping to. In this example the root category is ICD9CM.
-
j
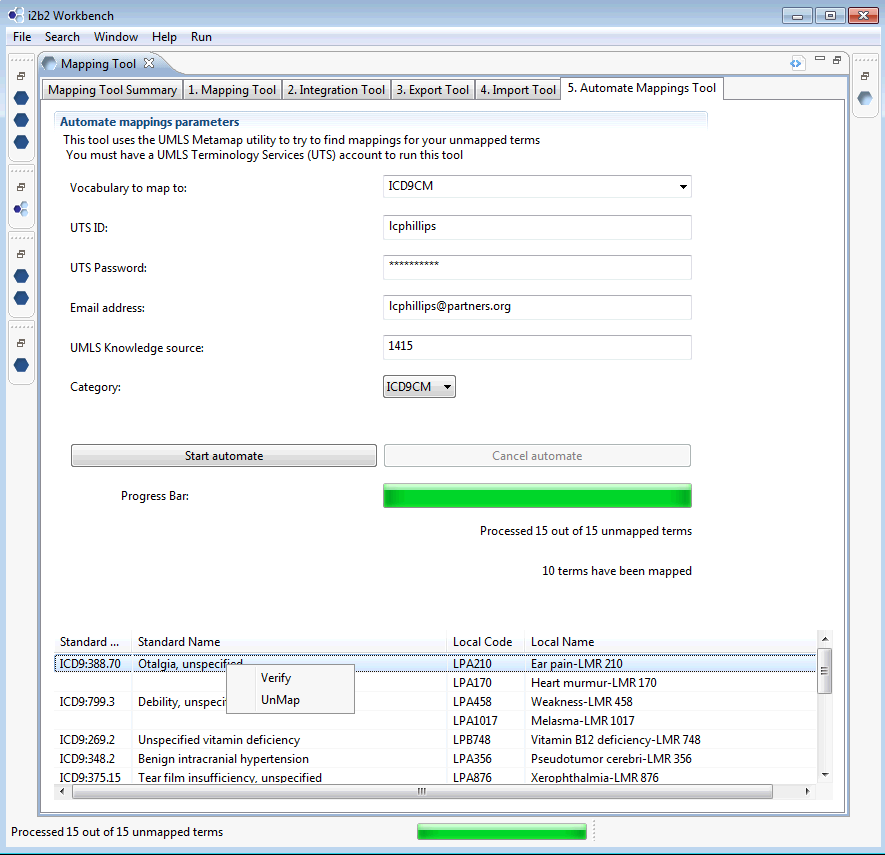
Once automation begins, you will begin to see results in the bottom half of the screen. The next page shows a portion of the results after all terms have been processed.
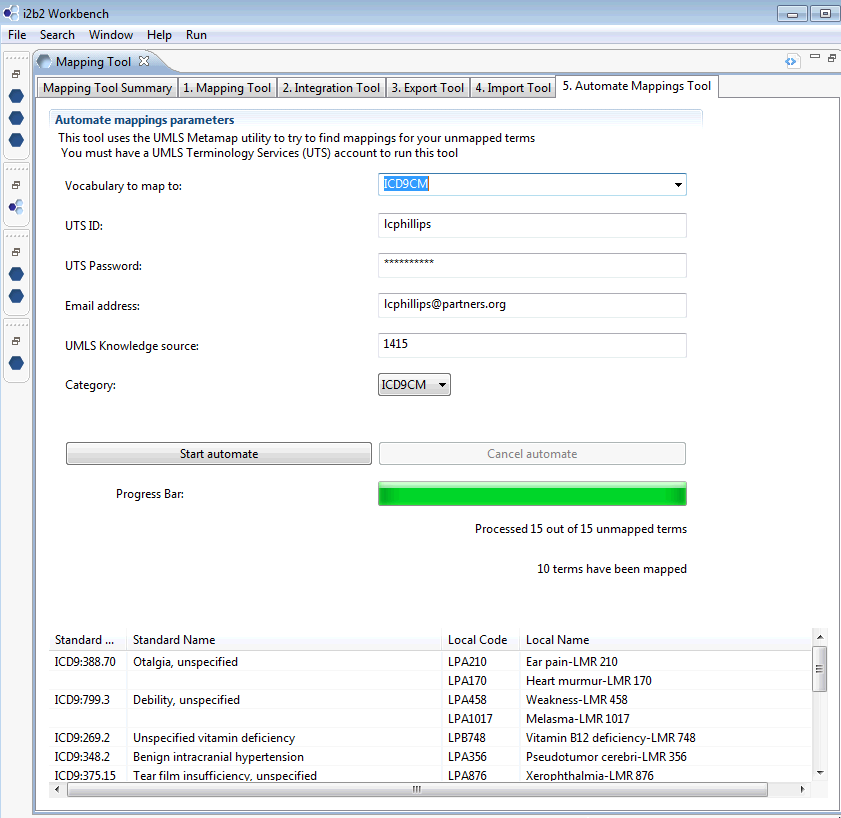
You may also use this screen to verify correct results are delete/unmap incorrect results.
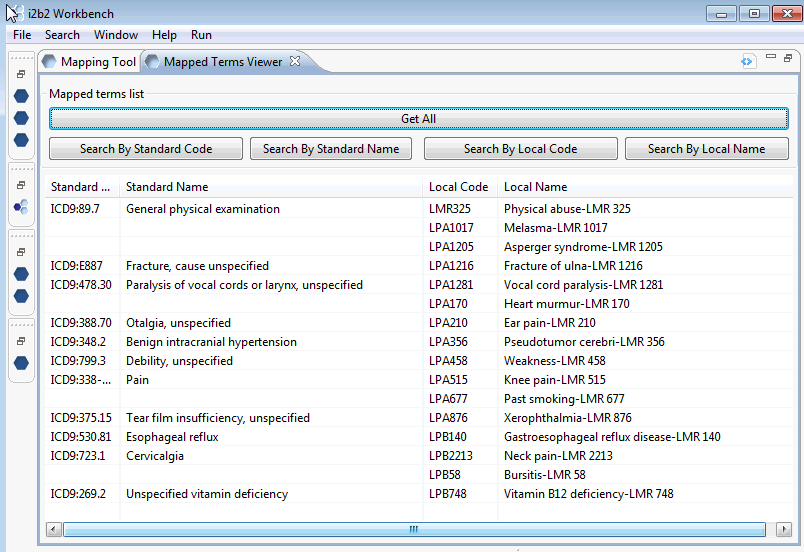
The Mapped Terms Viewer allows to you look at the content of the project_ont_mapping table. It is intended as a companion tool of the Mapping Tool and provides another method to review your mappings.
You may acquire the entire content of the project_ont_mapping table (Get All) or search for terms of interest by Standard code or Standard Name; Local code or Local name. In this tool ‘Standard’ refers to the target/destination ontology and ‘Local’ refers to the terms you are mapping. You may also sort the table content clicking on the table’s column headings. For instance to sort the table by Local Name, click on the column heading “Local Name’
One handy use for this tool is look up mapped terms similar to ones you have left to map. Our example, although small, shows that Gastroesophageal reflux disease was mapped to Standard code ICD9:530.81 This information may be used as a suggestion on where to map the remaining similar unmapped terms.
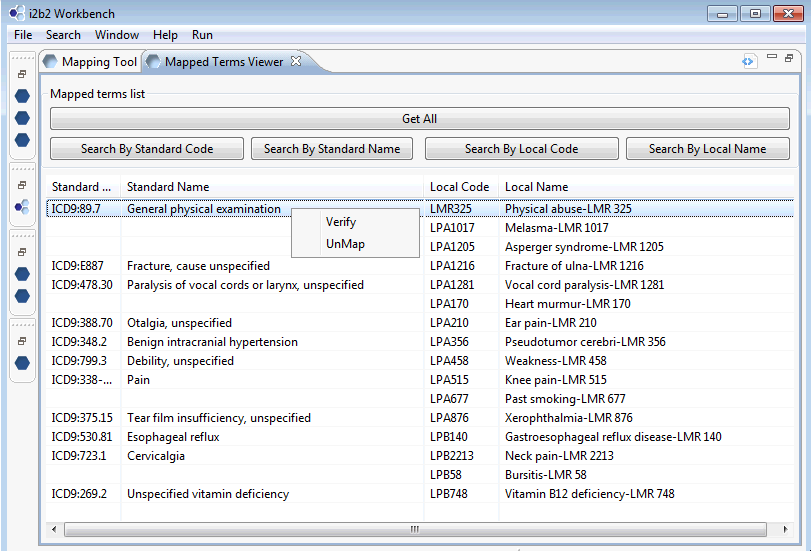
You may also verify or validate your mappings from this screen. The term Physical abuse should not be mapped to the term General physical examination and can be unmapped here.
Each step in the recommended mapping workflow is described below.
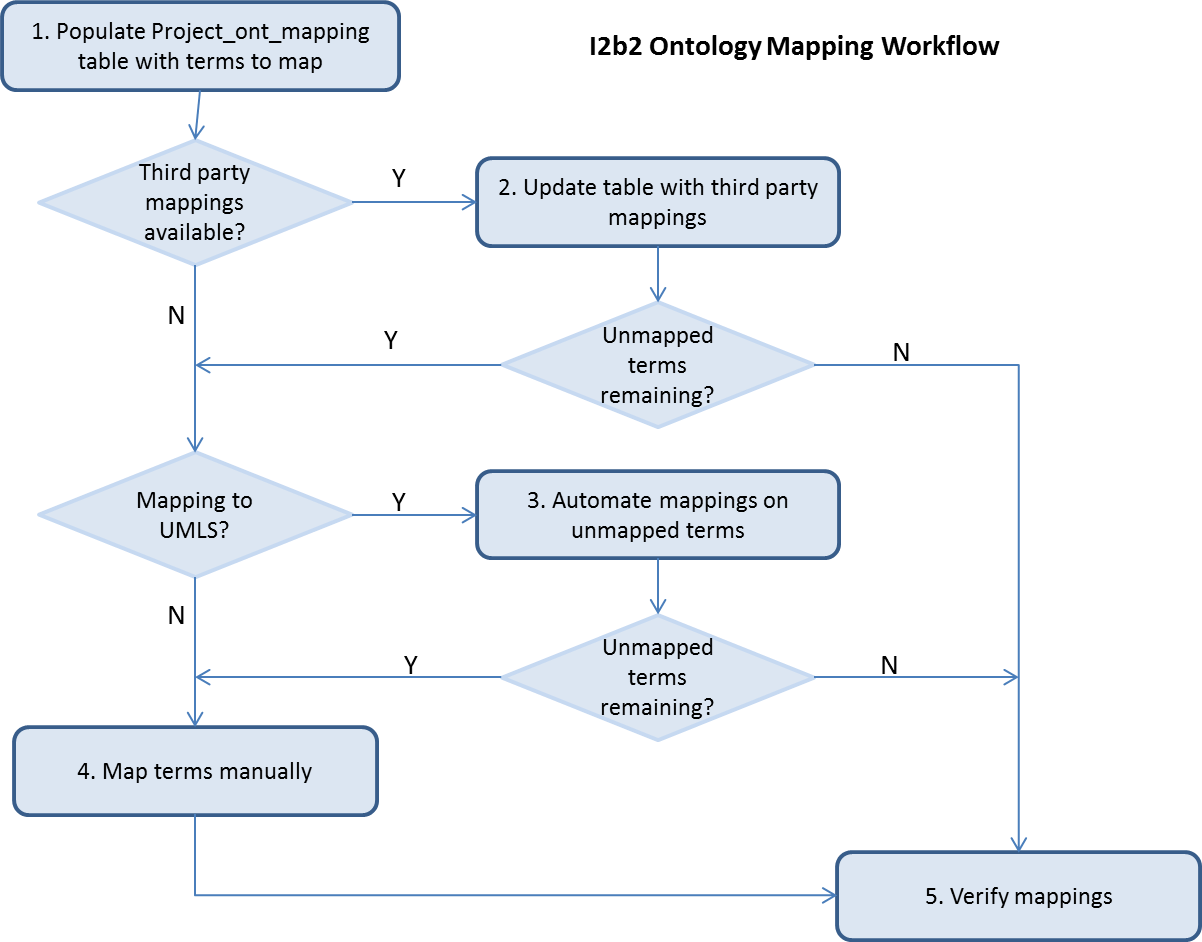
- Populate the project_ont_mapping table with terms to map.
Populate the source fields of project_ont_mapping table with the terms to be mapped. Fields source_name, source_basecode are required, source_fullname, source_tooltip are optional; fill them in if you have the data from an ontology in use on another project.
- Update the project_ont_mapping table with third party mappings if available.
For each term to map, fill in the destination_basecode and/or the destination_name from third party mappings. Backfill the destination_fullname from your target ontology by matching on the destination_basecode.
- Automate mappings on unmapped terms
If you are mapping to an UMLS vocabulary, you may opt to run the automated mappings feature on tab 5 on any unmapped terms. Specific details to perform this task are highlighted in section 3.2.4. You may verify mappings generated by this tool in the results table. Due to limitations on the UTS server, it is not recommended to run this tool on more than 2000 unmapped terms.
- Map terms manually
Any remaining unmapped terms must be mapped manually. See section 3.2 describing tab 1 and/or the overview slides for details on how to map manually using the Mapping tool.
- Verify mappings
There are two options for verifying your mappings: a) Use the Mapped Terms Viewer shown in section 3.3 or b) walk down the tree shown in tab 1 and verify terms as you progress through the tree. See section 3.2 describing tab 1 and/or the overview slides for details on how to verify and/or modify your mappings using the Mapping tool.
Your mappings are complete. Congratulations! Now what?
5.1.1 Integration
Once your mappings are complete, you will want to generate a metadata table that merges all your mapped terms into a final table. Refer to sections 3.2.1 for instructions on how to run the Integration step. If not done previously, the Integration table must be configured as described in the Data Installation Guide.
5.1.2 Export
When integration is complete, you are now ready to export the final ontology for use in your project. See section 3.2.2 for details.