i2B2 Admin Help Documentation
Version 1.8.1
Updated 05/2024
PDF versions available here
Table of Contents
1. Admin Plugin Introduction
1.1 Accessing Admin Module
2. Managing i2b2 Users
2.1 User Data
2.1.1 Add a New User
2.1.2 Edit a User in i2b2
2.1.3 Delete a User in i2b2
2.2 User Parameters
2.2.1 Add a User Parameter
2.2.2 Edit a User Parameter
2.2.3 Delete a User Parameter
3. Managing i2b2 Projects
3.1 Project Data
3.1.1 Add a New Project
3.1.2 Edit a New Project
3.1.3 Delete a New Project
3.2 Project Parameter
3.2.1 Add a Parameter to a Project
3.2.2 Edit a Parameter for a Project
3.2.3 Delete a Parameter for a Project
3.3 Project Data Source
3.3.1 Add a Data Source to a Project
3.3.2 Edit a Data Source for a Project
3.4 Project Users
3.4.1 Define a Project User Roles
3.4.2 Project User Parameters
4. Managing i2b2 Hive Data
4.1 Hive Data
4.1.1 Edit Hive Data
4.2 Hive Parameters
4.2.1 Add a Hive (Global) Parameter
4.2.2 Edit a Hive (Global) Parameter
4.2.2 Delete a Hive (Global) Parameter
1. Admin Plugin Introduction
Now that you have finished installing the i2b2 cells and clients the next step is to setup your users and projects in the i2b2 Administration Module. This chapter will contain various sections on how to save data and parameters for the users, projects and hive. There is also a section on the different Authentication Methods supported by the i2b2.
The main goals of the admin module is to help:
- Manage users and permissions
- Create projects and manage user access to projects
- Define HIVE settings
1.1 Accessing Admin Module
The i2b2 Administration Module can be accessed as a plug in.
- Click "Analysis Tools"
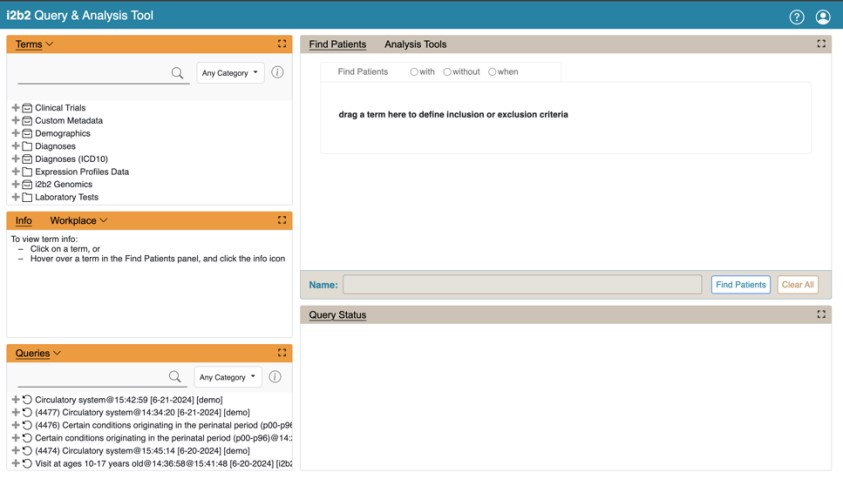
- Select "Admin" as the Category
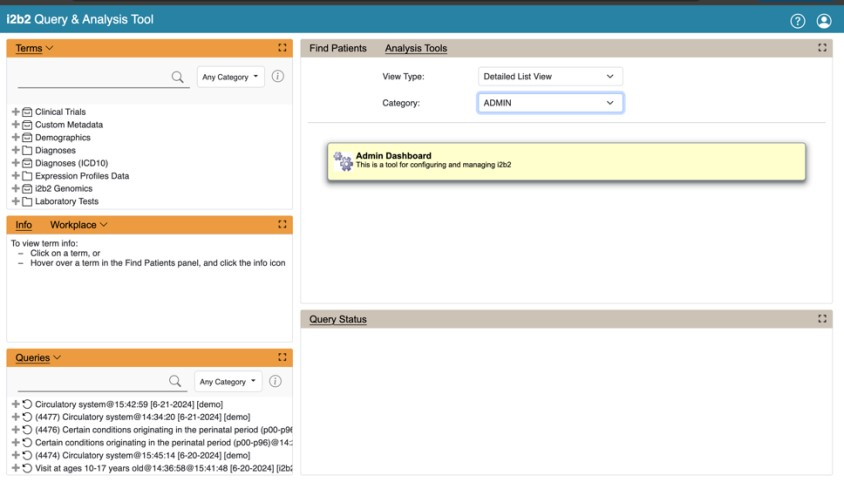
- Click Admin Dashboard
- This will load the i2b2 Administration Module displaying the User tab.
2. Managing i2b2 Users
Everyone who uses the i2b2 has to be setup as an i2b2 user in the i2b2 Administration Module. The management of these users is done under Users and the following functions for managing your users are available.
- Add, edit, and delete user(s) and user's permission setting
- Add, edit, and delete user parameter(s)
The steps on how to use these features are defined in one of the sections that follow
2.1 User Data
The User Data page captures the following general information about a user.
Field | Description | Required | |
User Name | • | A unique id for the user. | Yes |
User Full | • • | The name of the user. | Yes |
User Email | • | At this time, this field is not implemented in the i2b2 core cells and clients. | No |
User | • | The password the user will enter when logging into the i2b2 Web Client, Workbench and Admin. | Yes |
Is Admin | • | A Yes response means the user is an administrator. This means they can log into the i2b2 Admin and will have access to all the cells, projects and users. | Yes |
2.1.1 Add a New User
The following steps outline the process of adding a new user in the i2b2 Administration Module.
Assumption: The following steps assume you are already logged into the i2b2 Administration Module. If you do not know how to login please see the chapter titled i2b2 Administration Module
Install.
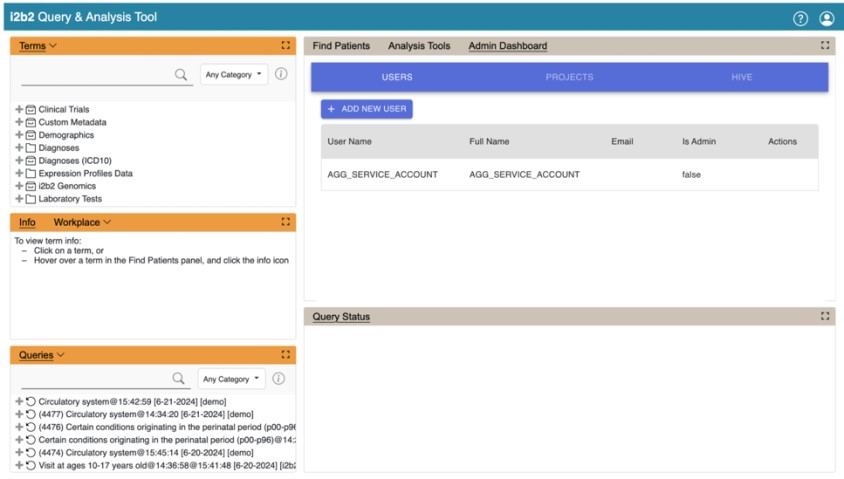
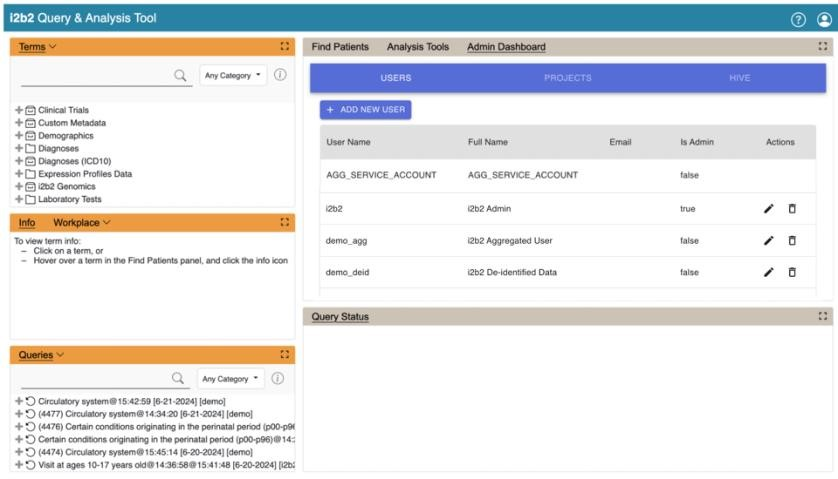
- In the Admin Dashboard, click on Users. It is the default view. The AGG_SERVICE_ACCOUNT is automatically added through the i2b2 Installation guide.
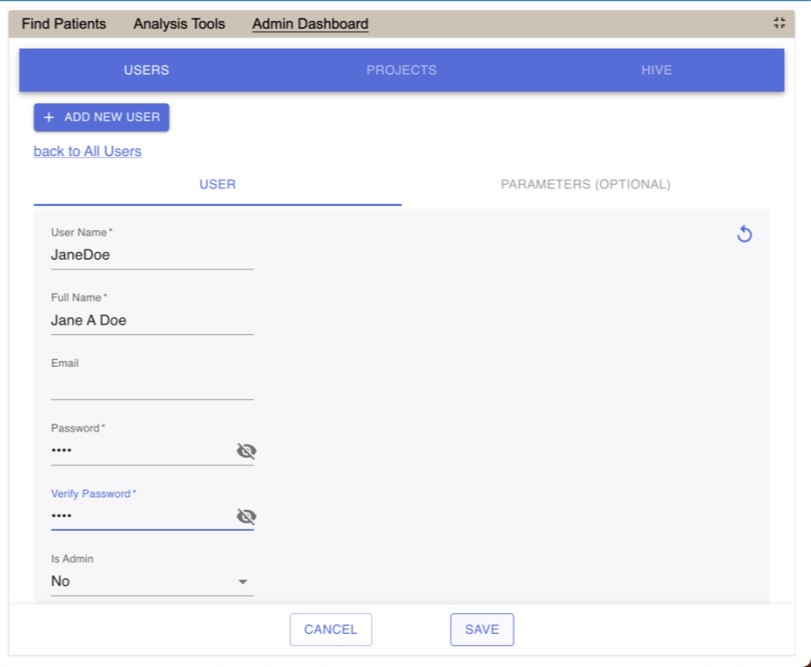
- Click "+ADD NEW USER" button. The page to add users will display.
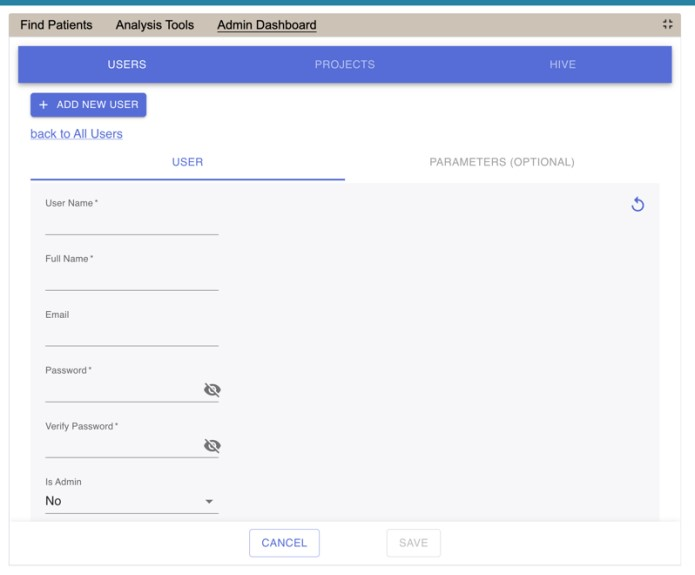
- Enter the information for the user you are adding.
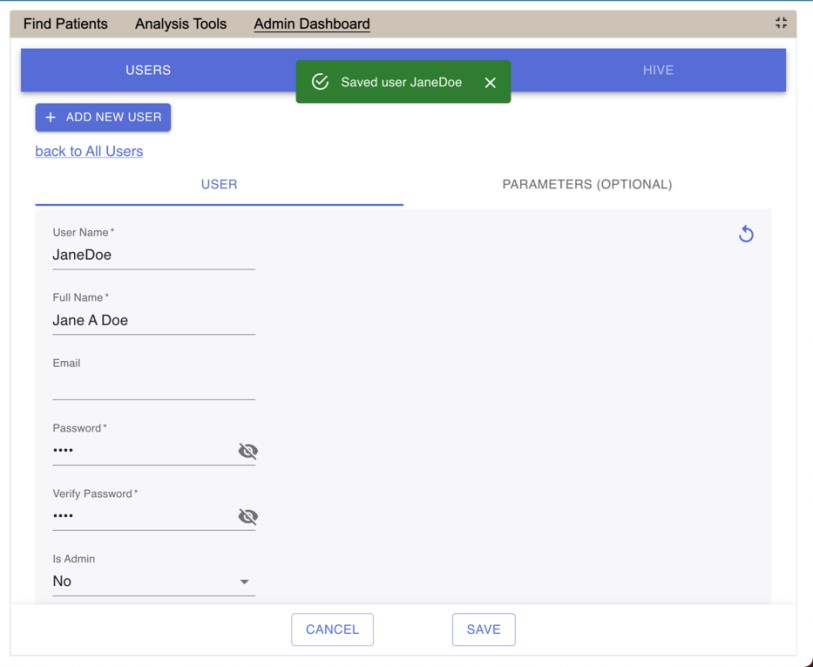
Warning If Is Admin is set to Yes then the user will be able to log into i2b2 Admin Module. This means they are able to access information for ALL users, projects and cells.
- Click on Save to save the user. The user will be added to the list of users on the Manage page.
2.1.2 Edit a User in i2b2
The following steps outline the process of editing a user in the i2b2 Administration Module.
Assumption: The following steps assume you are already logged into the i2b2 Administration Module. If you do not know how to login please see the chapter titled i2b2 Administration Module
Install.
- In the Admin Dashboard, click on Users. It is the default view.
- Click the pencil icon in the row of the name of the user you want to edit.
- The User page will display.
- Make the changes to the user and click on Save to save the changes.
2.1.3 Delete a User in i2b2
The following steps outline the process of deleting a user in the i2b2 Administration Module.
Assumption: The following steps assume you are already logged into the i2b2 Administration
Module. If you do not know how to login please see the chapter titled i2b2 Administration Module Install.
- In the Admin Dashboard, click on Users. It is the default view.
- Click the trash icon in the row of the name of the user you want to edit.
- Confirm the action. The user will be removed from the list of users on the Users page.
2.2 User Parameters
Parameters entered on a user are known as User Parameters and are specific to the user. The user parameter only affects the user in which it is entered on; it does not affect other users and it is not specific to any one project.
User Parameters • Specific to the user in which it is defined. • Does not affect other users. • Is not specific to any one project.
2.2.1 Add a User Parameter
The following steps outline the process of adding a parameter to a user from within the i2b2 Administration Module.
Assumption: The following steps assume you are already logged into the i2b2 Administration Module. If you do not know how to login please see the chapter titled i2b2 Administration Module
Install.
- In the Admin Dashboard, click on Users. It is the default view.
- Click the pencil icon in the row of name of the user you want to add a parameter to.
- Click on the Parameters (optional) option that displays next to the User's tab.
- The Parameters List page will display.
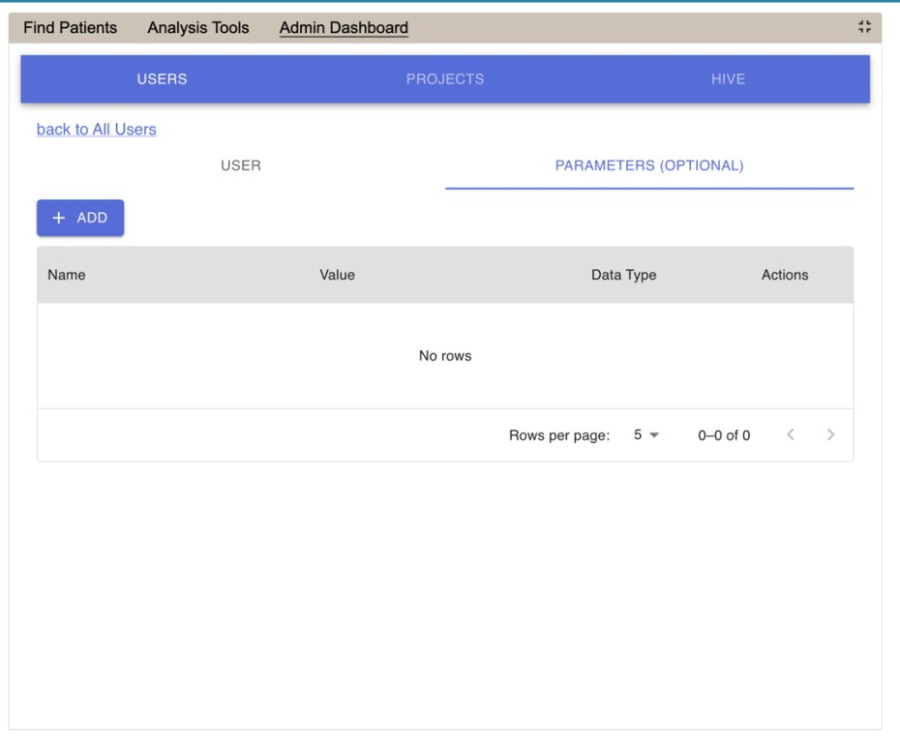
- Click on the Add button. A new row will display.
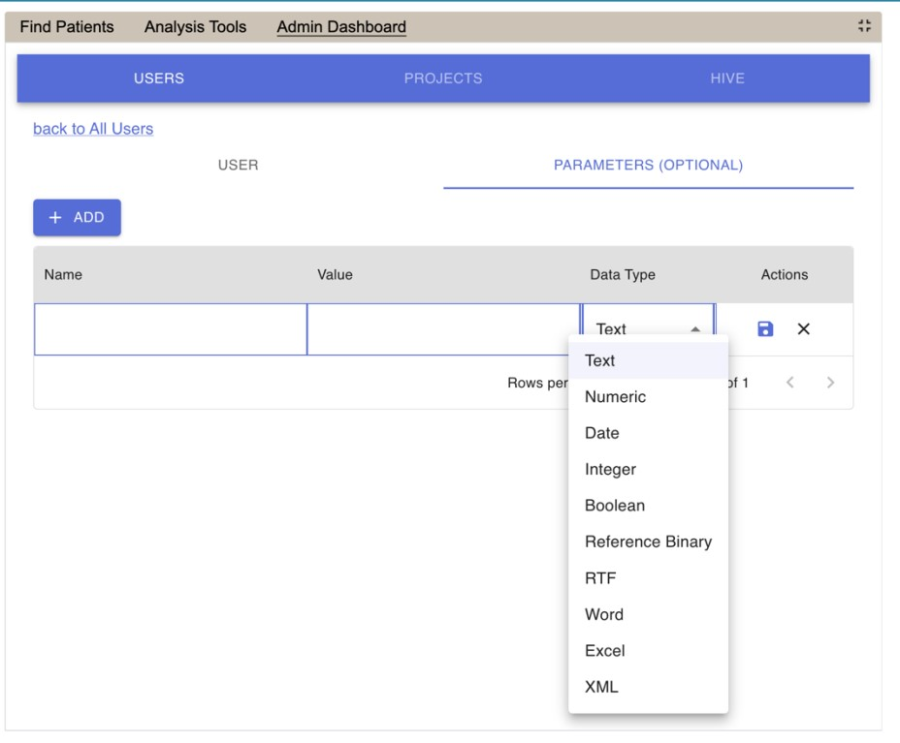
- Enter the name of the parameter, the value for the parameter and the data type for the parameter.
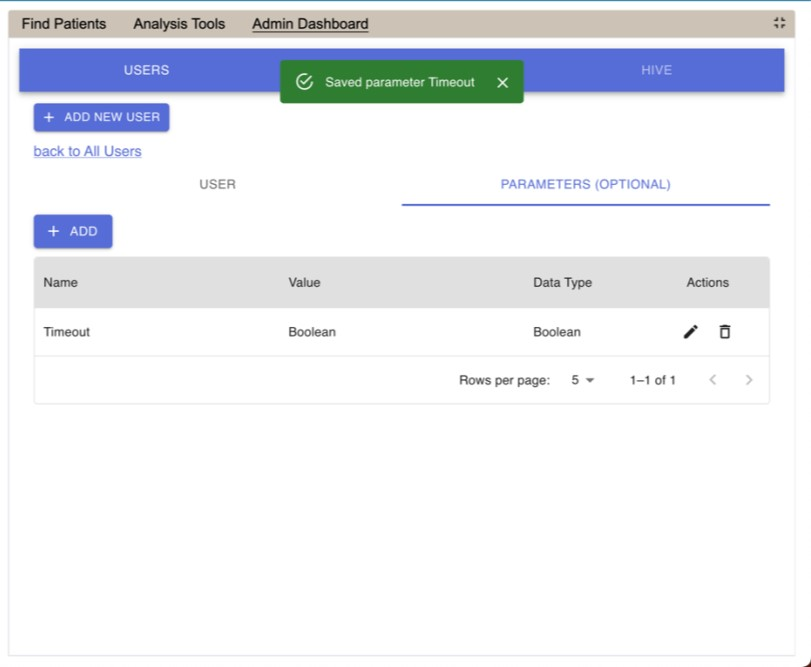
- Click on Save to save the new parameter.
- The Parameters List page will display with the new parameter.
2.2.2 Edit a User Parameter
The following steps outline the process of editing a user parameter in the i2b2 Administration Module.
Assumption: The following steps assume you are already logged into the i2b2 Administration Module. If you do not know how to login please see the chapter titled i2b2 Administration Module
Install.
- In the Admin Dashboard, click on Users. It is the default view.
- Click the pencil icon in the row of the name of the user you want to add a parameter to.
- Click on the Parameters (optional) option that displays next to the user's tab.
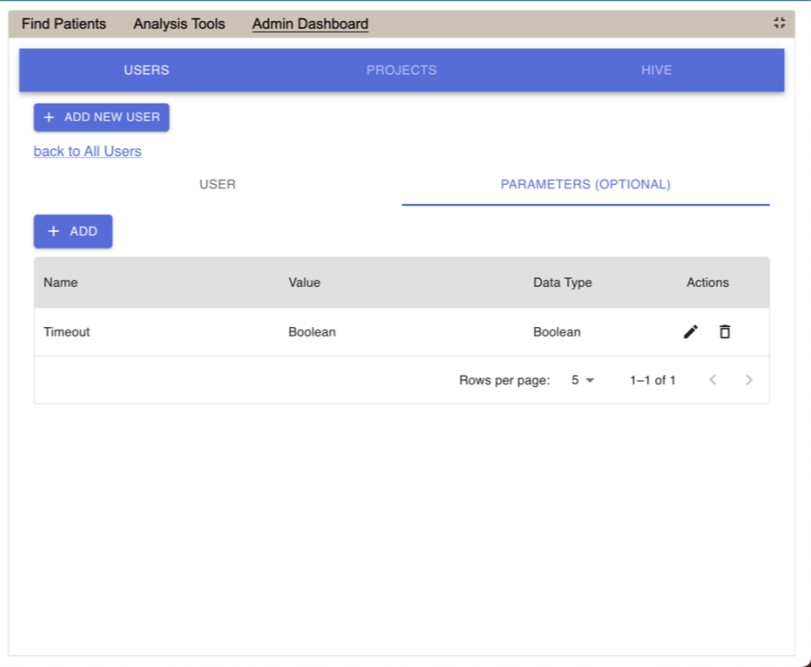
- The Parameters List page will display. A list of parameters entered for that user will display.
- Click the pencil icon in the row of the name of the parameter you want to edit.
- The Edit Parameter fields will display for that row.

- Make the changes to the parameter and click on the Save icon to save the changes.
2.2.3 Delete a User Parameter
The following steps outline the process of deleting a user parameter in the i2b2 Administration Module.
Assumption: The following steps assume you are already logged into the i2b2 Administration Module. If you do not know how to login please see the chapter titled i2b2 Administration Module
Install.
- In the Admin Dashboard, click on Users. It is the default view.
- Click the pencil icon in the row of the name of the user you want to delete a parameter for.
- Click on the Parameters (optional) option that displays next to the user's tab.
- The Parameters List page will display. A list of parameters entered for that user will display.
- Click the trash icon in the row of the name of the parameter you want to delete.

- Confirm the action. The user will be removed from the list of parameters for that user.
3. Managing i2b2 Projects
After a user is setup in the i2b2 Administration Module they need to be given access to one or more projects before they can log into the i2b2 Web Client or Workbench. The management of your project data is done in the i2b2 Administration Module within Manage Projects. The following functions for managing the projects are available.
Project Data
- Add, edit, and delete project(s)
- Add, edit, and delete project parameter(s)
- Add, edit data sources
Project Users
- Add and delete project user(s)
- Add and edit project user roles
- Add, edit, and delete project user parameter(s)
3.1 Project Data
The Project Data page captures the following general information about a project.
Field | Description | Required |
Project ID | A unique identifier for the project. | Yes |
Project Name |
| Yes |
Project Wiki | Currently not implemented in the i2b2 Web Client or Workbench. | No |
Project Key | Enter the encryption key that is used during the encryption / decryption process. | No |
Project | A brief description of the project. At this time it is only visible in the i2b2 Admin. | No |
Project Path | No |
3.1.1 Add a New Project
- In the Admin Dashboard, click on Projects.
- Click "+ADD NEW PROJECT" button. The page to add project-details will display.
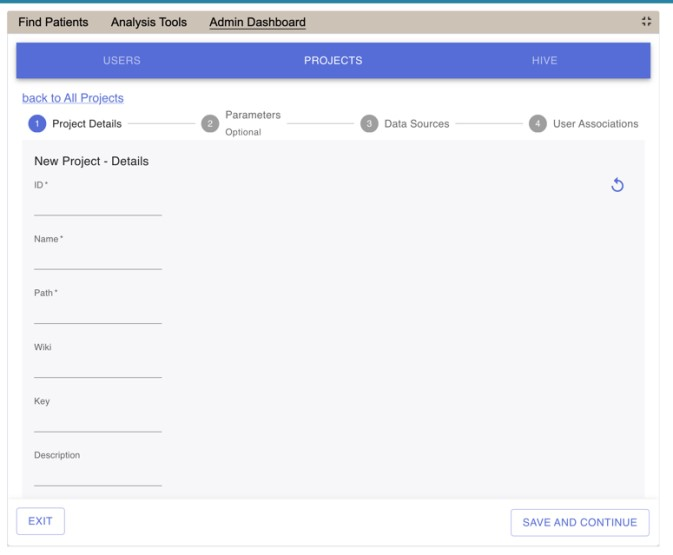
- Click Save and Continue.
- Add optional Project specific Parameters. See 3.2 Project Parameters.
- Add Data Sources. See 3.3 Project Data Source.
- See 3.4 to Add Users to the Project. See 3.5 Add User's Project Roles, and see 3.6 User's Project Parameters.
3.1.2 Edit a New Project
- In the Admin Dashboard, click on Projects.
- Click the pencil icon in the row of the name of the project you want to edit.
- Click Save and Continue
3.1.3 Delete a New Project
- In the Admin Dashboard, click on Projects.
- Click the trash icon in the row of the name of the user you want to edit.
- Confirm the action. The project will be removed from the list of projects on the Project page.
3.2 Project Parameter
Parameters entered on a project are known as Project Parameters and are specific to the project. The project parameter only affects the project in which it is entered on; it does not affect the other projects in the hive or any one user in the project.
Project Parameters | • | Specific to the project in which it is defined. |
• | Does not affect other projects. | |
• | Will affect all users who have access to the project. |
3.2.1 Add a Parameter to a Project
- In the Admin Dashboard, click on Projects.
- Click the pencil icon in the row of the name of the project you want to edit.
- Click on the Parameters (optional) option that displays next to the project details tab.
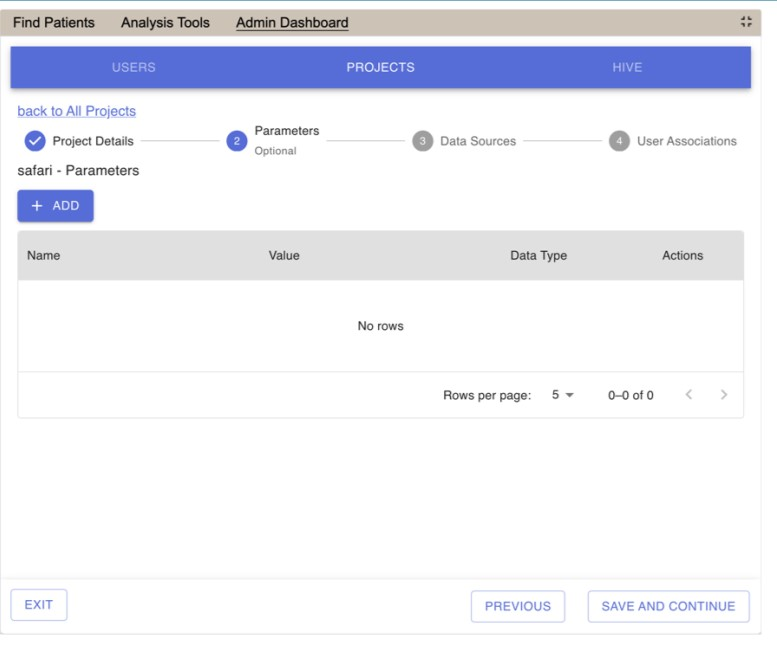
- The Parameters List page for the project will display. A list of parameters entered for that project will display.
- Click "Add" to add a new parameter.
3.2.2 Edit a Parameter for a Project
- In the Admin Dashboard, click on Projects.
- Click the pencil icon in the row of the name of the project you want to edit.
- Click on the Parameters (optional) option that displays next to the project details tab.
- The Parameters List page will display. A list of parameters entered for that project will display.
- Click the pencil icon in the row of the name of the parameter you want to edit.
- The Edit Parameter fields will display for that row.
- Make the changes to the parameter and click on the Save icon to save the changes.
3.2.3 Delete a Parameter for a Project
- In the Admin Dashboard, click on Projects.
- Click the pencil icon in the row of the name of the project you want to edit.
- Click on the Parameters (optional) option that displays next to the project details tab.
- The Parameters List page will display. A list of parameters entered for that project will display.
- Click the trash icon in the row of the name of the parameter you want to remove.
- Confirm the action. The parameter will be removed from the list of project parameters on the Project parameters page.
3.3 Project Data Source
3.3.1 Add a Data Source to a Project
- In the Admin Dashboard, click on Projects.
- Click the pencil icon in the row of the name of the project you want to edit.
- Click Save and Continue. The Project parameters page will display. Click Save and Continue.

- The Data Source page will display.
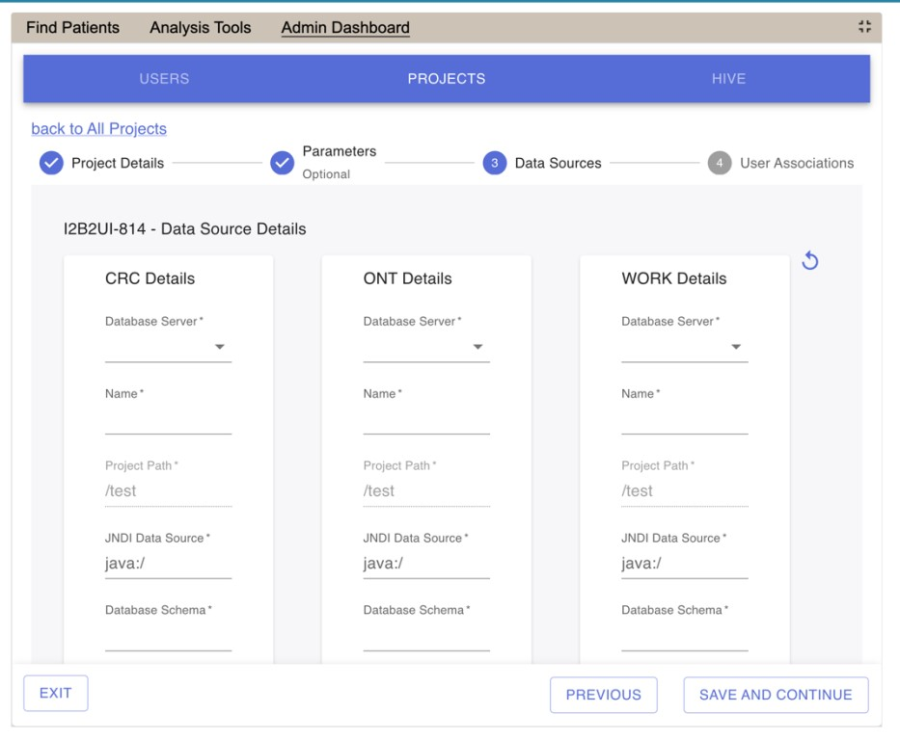
- Enter details for the CRC, ONT, and WORK data sources. Click Save and Continue.
3.3.2 Edit a Data Source for a Project
- In the Admin Dashboard, click on Projects.
- Click the pencil icon in the row of the name of the project you want to edit.
- Click Save and Continue. The Project parameters page will display. Click Save and Continue.
- The Data Source page will display.
- Edit the details for the CRC, ONT, and WORK data sources. Click Save and Continue.
3.4 Project Users
Each user will have at least two roles per user_id and project_id combination. These two roles can be further defined as a Data Protection role and a Hive Management role.
The data protection role establishes the detail of data the user can see while the hive management role defines the level of functionality the user has in a project. The following tables summarize the roles in a hierarchical order of least to most access.
Data Protection Roles
Role | Access Description |
DATA_OBFSC | OBFSC = Obfuscated
|
Role | Access Description |
DATA_AGG | AGG = Aggregated
|
DATA_LDS | LDS = Limited Data Set
|
DATA_DEID | DEID = De-identified Data
|
DATA_PROT | PROT = Protected |
Hive Management Roles
Role | Access Description |
USER | Can create queries and access them if he / she is the owner of the query. |
MANAGER | Can create queries as well as access queries created by different users within the project. |
3.4.1 Define a Project User Roles
- In the Admin Dashboard, click on Projects.
- Click the person icon in the row of the name of the project you want to add users to.
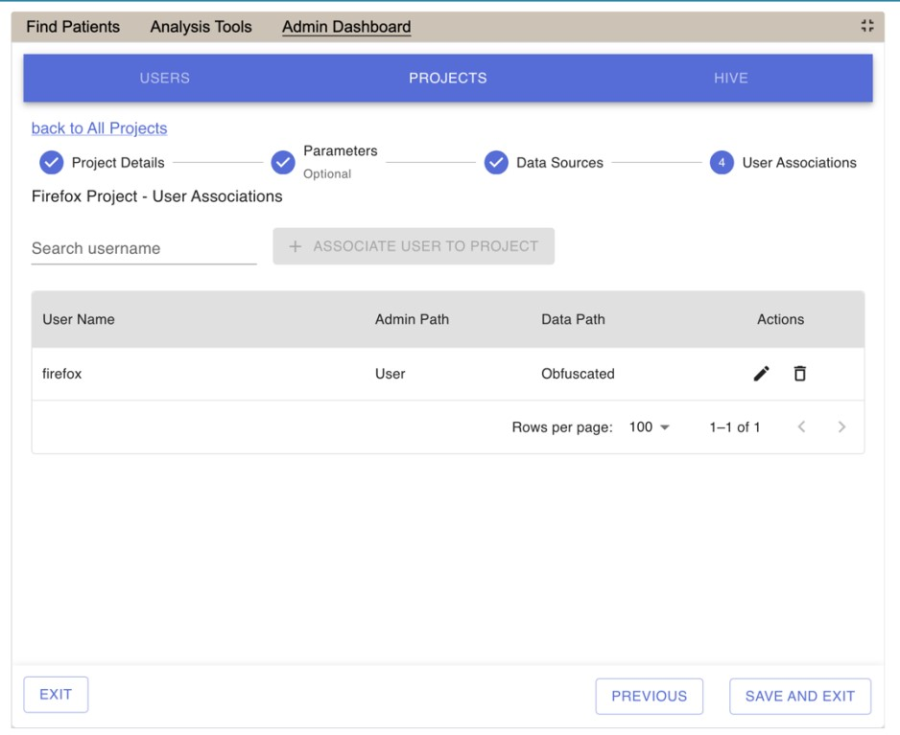
- On the User Association page for a given project, search by the username.
- The username will be displayed on the table below.
- Click the pencil icon next to a user to modify their user role for the project.
- Select the Admin Path, and Data Path.
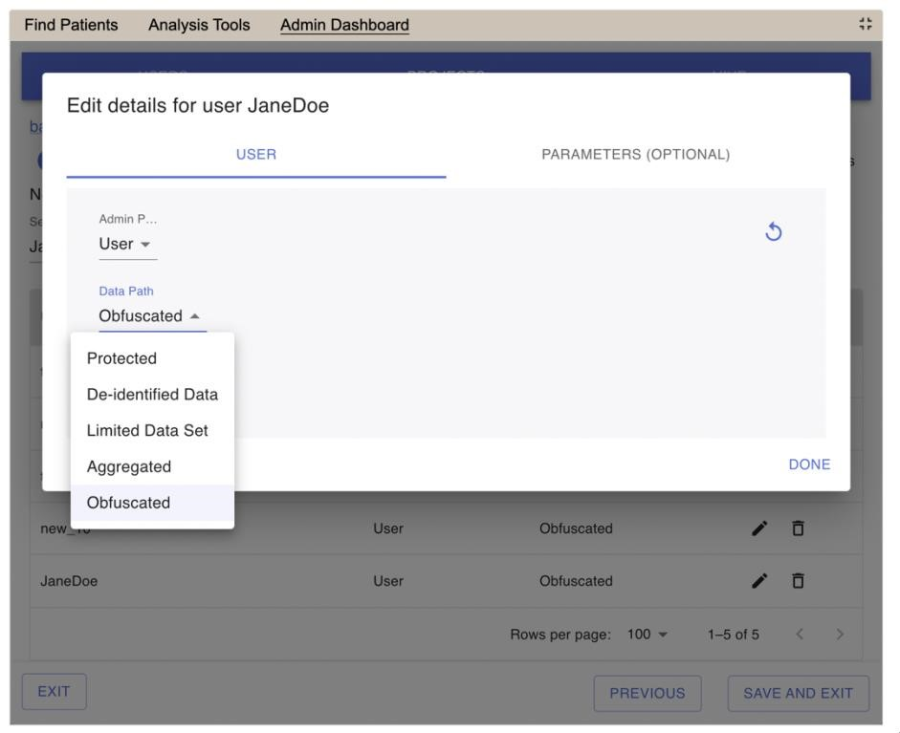
- Click done to Save.
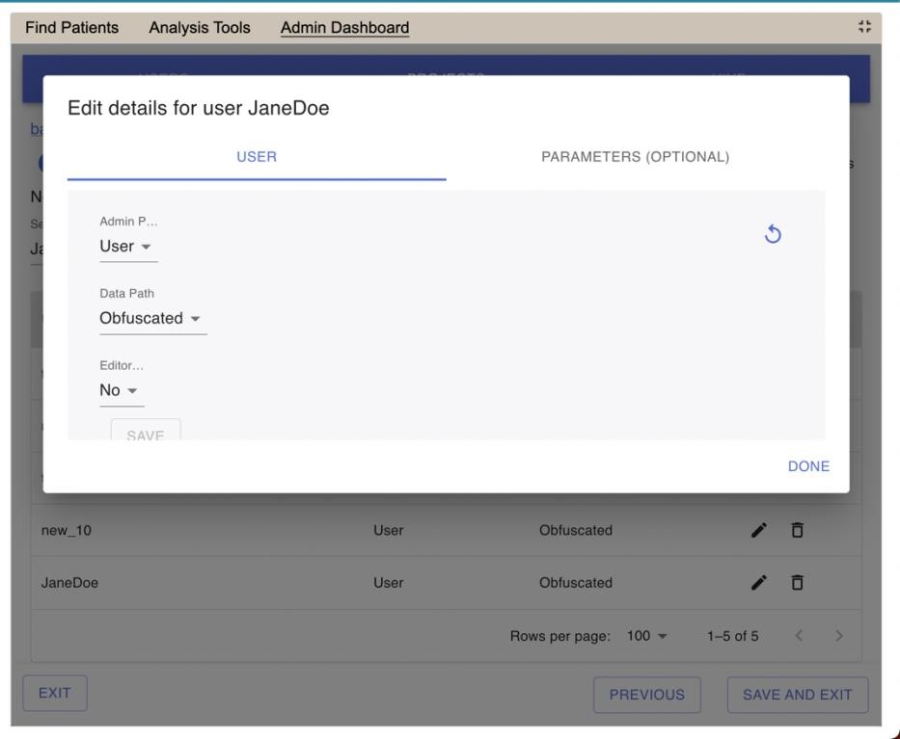
3.4.2 Project User Parameters
Project User Parameters | • | Specific to the user and the project in which it is defined. |
• | Does not affect other users within the project. | |
• | Does not affect other projects the user has access to. |
- In the Admin Dashboard, click on Projects.
- Click the person icon in the row of the name of the project you want to add project users parameters to.
- On the User Association page for a given project, click the pencil icon next to a user to modify their user role for the project.
- Select the Parameters tab
- Click done to Save.
4. Managing i2b2 Hive Data
The i2b2 hive and associated web services are the infrastructure used to integrate a collection of cells. The management of your Hive data is done in the i2b2 Administration Module within Manage Hive. The following functions for managing the hive are available.
- Edit hive data (Domain ID, Help URL, Domain Name, and Environment)
- Add, edit, and delete hive (global) parameter(s)
The steps on how to use these features are defined in the sections that follow.
4.1 Hive Data
The Hive Data page captures the following general information about a hive.
Field | Description | Required |
Help URL | A link to an external website that may contain additional information on using the i2b2 in your environment. | No |
Domain Name | The name of the domain in which this hive resides. | Yes |
Environment | The type of environment this hive resides. The options are: | Yes |
Note
The hive is created when you are installing the i2b2 server. You cannot add or remove a hive from within i2b2 Admin; however you can edit the hive's data.
4.1.1 Edit Hive Data
The following steps outline the process of editing the Hive Data in the i2b2 Administration Module.
Assumption: The following steps assume you are already logged into the i2b2 Administration Module. If you do not know how to login please see the chapter titled i2b2 Administration Module
Install.
- In the Admin Dashboard, click on Hive.
- Click on Hive Domain Settings. This is the default view.
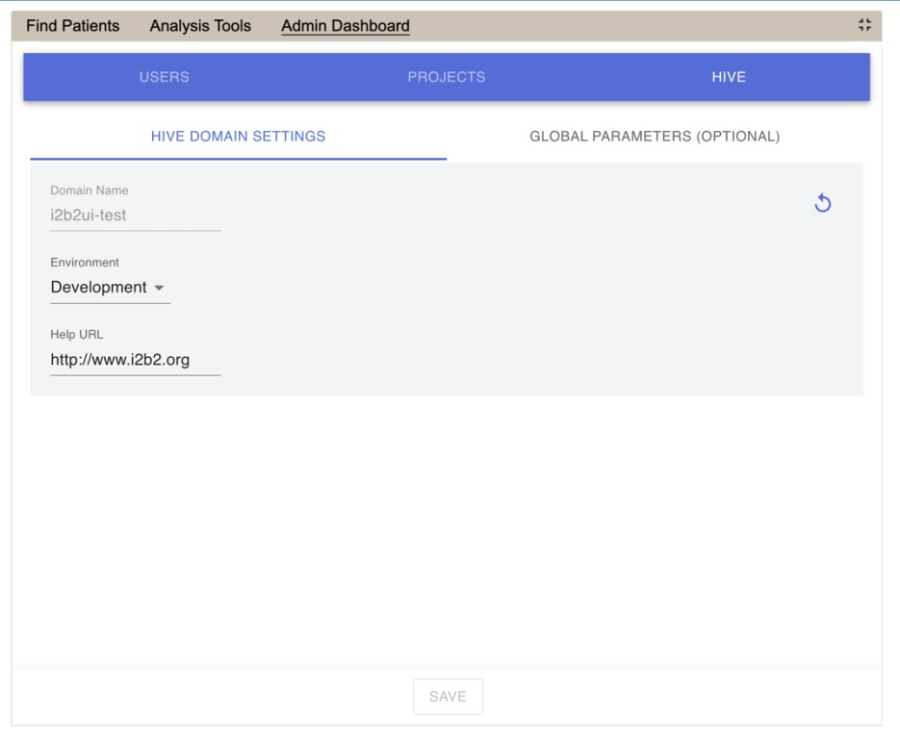
- Make the changes to the Hive Data and click on Save to save the changes.
4.2 Hive Parameters
Parameters entered on a project are known as Hive or Global Parameters and are specific to the hive (domain). A hive parameter is not specific to any one cell, project or user.
4.2.1 Add a Hive (Global) Parameter
The following steps outline the process of adding a parameter to the hive from within the i2b2 Administration Module.
Assumption: The following steps assume you are already logged into the i2b2 Administration Module. If you do not know how to login please see the chapter titled i2b2 Administration Module
Install.
- In the Admin Dashboard, click on Hive.
- Click on Global Parameters (Optional).
- The Parameters List page will display.
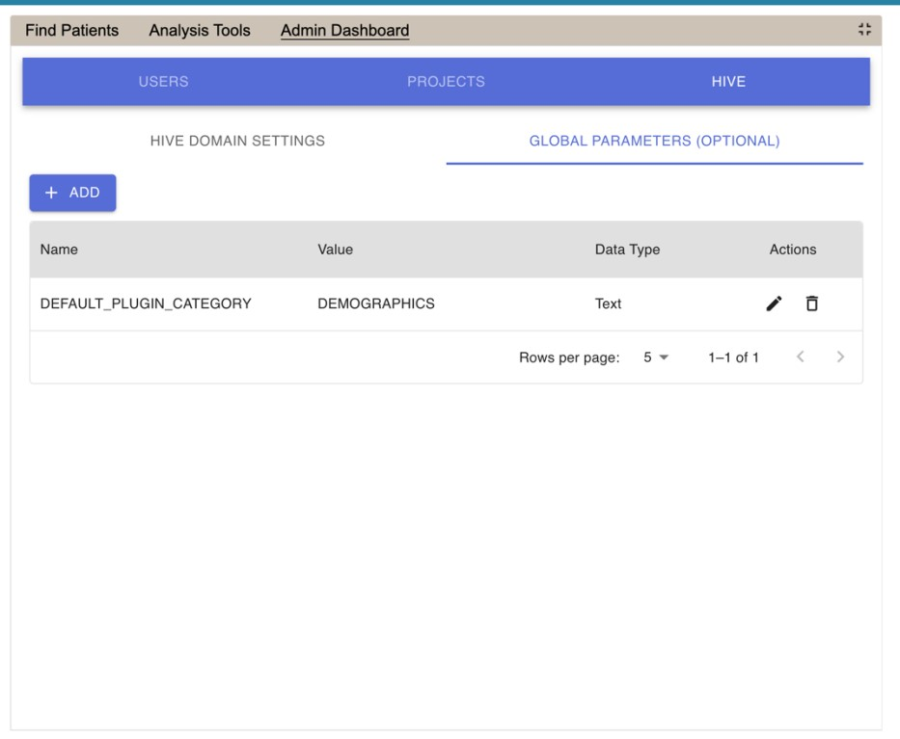
Click on Add New Parameter. The Enter Parameter page will display.
- Enter the name of the parameter, the value for the parameter and the data type for the parameter.
- Click on Save to save the new parameter. 7. The Parameters List page will display with the new parameter.
4.2.2 Edit a Hive (Global) Parameter
The following steps outline the process of editing a hive parameter in the i2b2 Administration Module.
Assumption: The following steps assume you are already logged into the i2b2 Administration Module. If you do not know how to login please see the chapter titled i2b2 Administration Module
Install.
- In the Admin Dashboard, click on Hive.
- Click on Global Parameters (Optional).
- The Parameters List page will display.
Click the pencil icon in the row of the name of the parameter you want to edit.
- The Edit Parameter fields will display for that row.
- Make the changes to the parameter and click on the Save icon to save the changes.
4.2.2 Delete a Hive (Global) Parameter
The following steps outline the process of deleting a hive parameter in the i2b2 Administration Module.
Assumption: The following steps assume you are already logged into the i2b2 Administration Module. If you do not know how to login please see the chapter titled i2b2 Administration Module
Install.
- In the Admin Dashboard, click on Hive.
- Click on Global Parameters (Optional).
- The Parameters List page will display.
Click the trash can icon in the row of the name of the parameter you want to remove.
5. Confirm the action. The parameter will be removed from the list of hive (global) parameters on the page.