Release Notes for i2b2 Version 1.7 Release
This release note addresses enhancements and other information about the i2b2 version 1.7 release. Unless otherwise specified, these notes apply to the following operating systems:
- Apple Macintosh OS x 10.4/5
- Apple Macintosh OS x 10.6 (Snow Leopard)
- Microsoft Windows XP Professional
- Microsoft Windows Vista Professional
- Microsoft Windows 7
- Microsoft Windows Server 2003
Additional Information
Included in this document are the following sections:
Section |
Includes |
Installation |
Information related to installing the release. |
Third Party Software |
Software that is utilized by i2b2 but is owned, maintained and licensed by other companies is referred to as "Third Part Software". Any version changes made or needed to be made to the users system will be noted in this section. |
New Features |
A list of new enhancements will be included in this section. A brief description and a reference to the specification will be provided. |
Updates |
Any changes that are not considered an enhancement will be included in this section. This may be a fix for a problem found or may be a change to existing code but not related to a problem. |
Licensing |
i2b2 licensing information |
Trademarks |
Trademark information |
Installation
This release note applies to you if you are upgrading to 1.7 from a computer running an earlier version of i2b2. If you are installing 1.7 from a computer running the i2b2 Workbench, ensure that the workbench and all eclipse applications are closed prior to installing this release.
Release 1.7 contains changes to the i2b2 Workbench (eclipse client), Web client, server, and database therefore it is necessary to update all components.
WHERE DO I START?
Prior to setting up the i2b2 server, workbench or VM Image it is highly recommended that you read one of the following documents located in the documentation folder.
1. Hive_Installation_Guide.pdf |
use for new installations |
2. Data_Installation_Guide.pdf |
use for new installations of the demo and metadata |
3. i2b2Workbench_Install_Guide.pdf |
use for installing the i2b2 Workbench (Client) |
4. vmware_Install_Guide.pdf |
use for installing the VM Image |
All of these documents will explain what needs to be done during the setup and in what order.
Third Party Software
In release 1.7 the i2b2 Server has been updated to use the following versions of third party software.
- Jboss has been upgraded to 7.1.1
- Apache Ant has been upgraded to 1.8.2
- Apache Axis2 has been upgraded to 1.6.2
{warning:title=Warning}
Only the i2b2 Server was upgraded to use the above versions of Jboss, Ant, and Axis2. The i2b2 Workbench will continue to use the previous versions. As a result, the source codes for the server and the workbench client have different plug-ins for the commons.
Server edu.harvard.i2b2.server-common
Client edu.harvard.i2b2.common
{warning}
New Features
i2b2 release 1.7 contains many new features, all of which have been outlined below.
Temporal Queries
In release 1.7 we introduce the ability to create and run temporal queries, which are queries based on the timing of an event. The new Temporal Query Tool view extends the query functionalities provided by the classic Query Tool view.
In the Temporal Query Tool view there are three pages or steps a user must go through when defining and running a temporal query.Please see the i2b2 Temporal Query Tool User Guide for detailed information about using the new Temporal Query Tool view.
Page 1: Define Population
Page 2: Define Temporal Relationships
The temporal query is a new type of query introduced in release 1.7. There are two components to these queries that make them a little more complex than the type of queries available prior to 1.7 (classic i2b2 queries).
The first component to these queries is the list of events defined by the user.
The second component is the relationship between the events. This relationship is referred to a Temporal Relationship, which is best described as how the different events relate in regards to the time in which the event(s) occurred.
Users can also define a patient or event population in which they wish to run the temporal query against. This step is optional and is not required in order to run the temporal query.
The process in which temporal queries are defined is slightly different in the i2b2 Web Client and the i2b2 Workbench. In the i2b2 Web Client the existing Query Tool view has been modified to accommodate Temporal Queries while a new view called Temporal Query Tool view has been created for the i2b2 Workbench.
The new Temporal Query Tool view and the modifications to the existing Query Tool view extend the query functionalities provided by the classic Query Tool view.
It is important to note that while the manner in which users setup a temporal query is different in each of the clients the overall functionality is the same.
The following sections will describe how to run Temporal Queries in the i2b2 Web Client and the i2b2 Workbench.
i2b2 Web Client: Temporal Queries
In the i2b2 Web Client there are five basic steps in defining a temporal query in the Query Tool view.
- Change Temporal Constraint to Define sequence of Events.
- Define Population in which events occur (optional step).
- Define Events
- Define order of events (temporal relationships)
- Run the query
{info:title=Note}
For detailed information about creating Temporal Queries please see the Temporal Query help file located on-line from within the i2b2 Web Client.
{info}
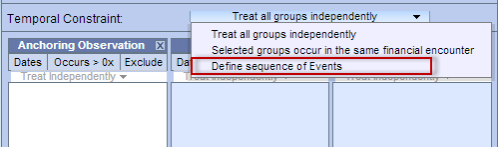
Step 1: Change Temporal Constraint
The first step is to change the Temporal Constraint to Define sequence of Events.
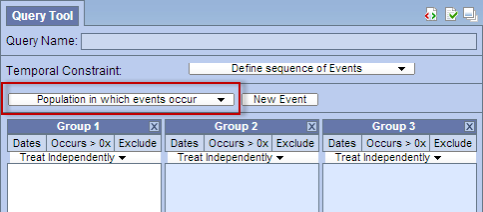
Step 2: Define Population in which events occur
Once you have changed the Temporal Constraint to be Define sequence of Events a new Page selection box will appear below the Temporal Constraint section. The default page will be Population in which events occur. It is on this page you will define your population requirements.
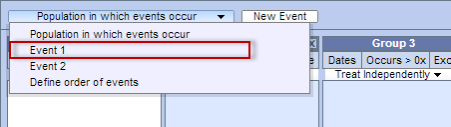
Step 3: Define Events
The events are the first component of a temporal query. There are no restrictions on the number of events you wish to define. The only requirement is that you have to define at least two events.
To define the events simply click on the Page selection box and select Event 1 from the drop-down list.
The groups and constraints for the events work in the same manner as they did for a traditional i2b2 query. Simply drag the items you want to include in Event 1 to the appropriate groups.
Once you have added your items to the groups you can click on the Page selection box and select Event 2 from the drop-down list. This will change the page to display the groups for Event 2.
If you need to add a third event you can click on the New Event button located next to the Page selection box.
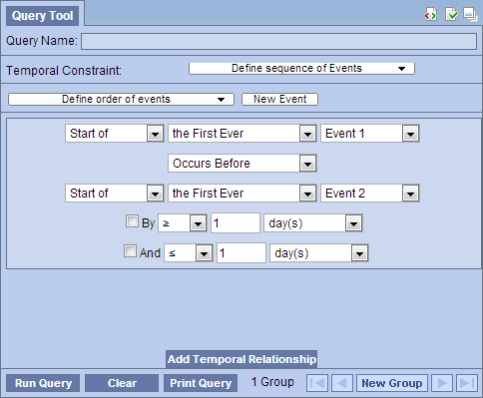
Step 4: Define Order of Events (Temporal Relationship)
As stated earlier the second component of a temporal query is the relationship between the events (temporal relationship). In the i2b2 Web Client this is done on the Define order of events page, which is accessed by clicking on the Page selection box and selecting Define order of events from the drop-down list.
The page will display as follows:
Step 5: Run Query
In the Web Client running a query works the same regardless of whether or not it is a Temporal Query or a traditional i2b2 query. By clicking on the Run Query button, the i2b2 client will send the request to the i2b2 server which will run the query as defined.
i2b2 Workbench: New Temporal Query Tool View
In the i2b2 Workbench there are three pages or steps in defining and running a temporal query in the new Temporal Query Tool view.
- Page 1: Define Population
- Page 2: Define Temporal Relationships
- Page 3: Review and Submit Query
Each page as well as defining constraints is further defined in the next few sections.
{info:title=Note}
For detailed information about using the Temporal Query Tool view, please see the help file for this view which is located on-line from within the i2b2 Workbench.
{info}
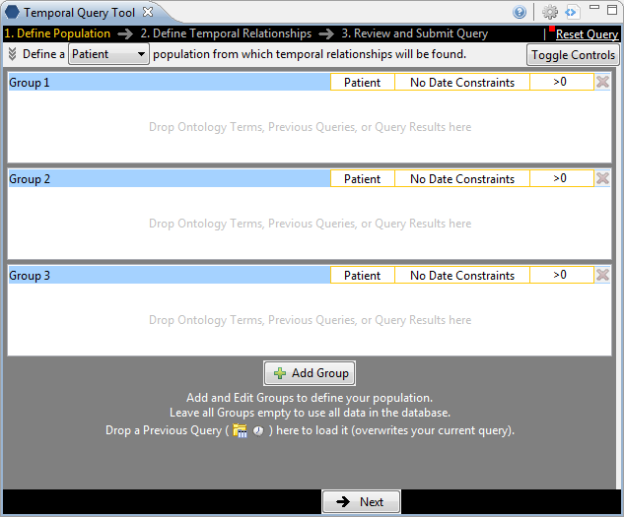
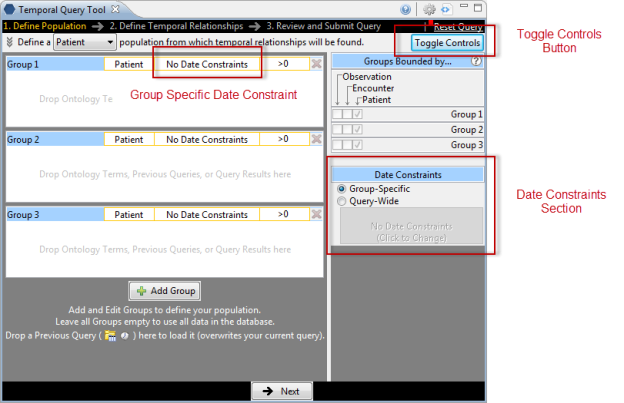
Page 1: Define Population
On this page you will define your population requirements.
Page 2: Define Temporal Relationships
As stated earlier there are two components to a temporal query; (1) List of events and (2) the relationship between the events.
The second page is where you will define both the events and their relationship.

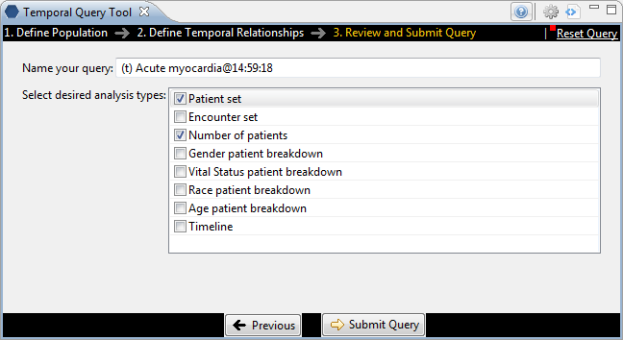
Page 3: Review and Submit
On this page the name of the query will default and if you wish to rename it you can do so at this point. Whatever is entered here will be the name given to the query when it is run. In addition you can select the Analysis Types that you want when running the query.
Defining Date Constraints and Exclusions in Temporal Query Tool View
There are some minor differences in terminology or layout that needs to be noted in this release notes.
Defining the Date Constraints:
In the classic Query Tool view you can only define date constraints on the group / panel level. In the new Temporal Query Tool view you can now define a data constraint on either the query level or the group level. If you define it on the query level it will default the same date constraint for all the groups and the date constraint on the panel level will not be available for selection.
If you want to define it on the panel level select Group-Specific and then click on the column that say No Date Constraint in the group you wish to define the constraint.
Exclude Panel:
The ability to exclude all items in a group does exist in the new Temporal Query Tool view. However, the method in which it is defined differs between the classic Query Tool view and the Temporal Query Tool view.
In the existing Query Tool view ("Classic") the exclusion constraint was defined by clicking on the button labeled Exclude.
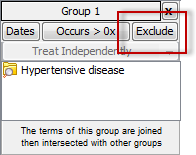
In the Temporal Query Tool view (New) the exclusion constraint was rolled into the window for defining the Occurrence constraint.
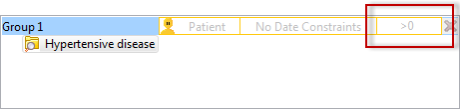
The Specify Occurrence Constraints window will open when you click on the box that displays the occurrence constraint. To set the exclusion constraint you need to select "= 0 (No Occurrences)" from the drop-down list.
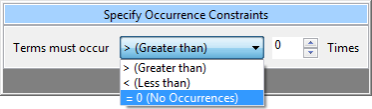
The above option is equivalent to the Exclude feature in the classic Query Tool view.
Previous Query: Filter list by user
New in release 1.7 is the ability to filter the list of previous queries by the user who created the query. In the Options dialog ( ![]() ) window there is a new field called Get previous queries for user. The default is all users and can be changed to a specific user by clicking on the down arrow to display the drop-down list. Once you select the user and click on the OK button, the Previous Query view will refresh and display only those previous queries created by the selected user.
) window there is a new field called Get previous queries for user. The default is all users and can be changed to a specific user by clicking on the down arrow to display the drop-down list. Once you select the user and click on the OK button, the Previous Query view will refresh and display only those previous queries created by the selected user.
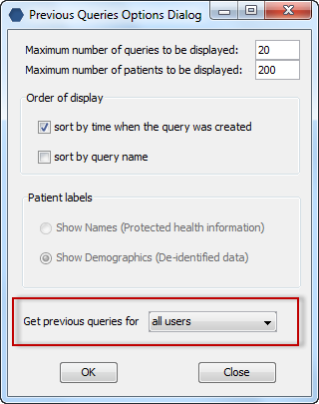
{note:title=Important}
In i2b2 only managers are allowed to view queries for another user, therefore this feature is only available to those users who have the role of MANAGER defined for the project. If a user does not have the manager role then this field will be inactive and unavailable for selection.
{note}
Previous Query: Search Previous Queries View
In release 1.7 the ability to search the Previous Queries view has been added. The functionality is very similar to the Find Terms view except it will search the Previous Queries view instead of Navigate Terms view. Users can search any of the three levels;
- Previous Query (name)
- Previous Query Result
- Patient
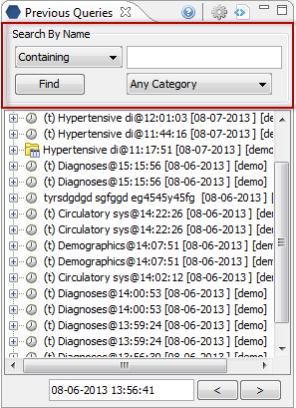
Previous Query: Page through previous queries by date
Users can now retrieve the next or previous grouping of previous queries by the date in which the query was created.

The Previous button ( ![]() ) will retrieve the group of previous queries that occur prior to the date displayed in the date / time field.
) will retrieve the group of previous queries that occur prior to the date displayed in the date / time field.
The Next button ( ![]() ) will retrieve the group of previous queries that occur after to the date displayed in the date / time field.
) will retrieve the group of previous queries that occur after to the date displayed in the date / time field.
Identity Management Cell (IM)
A new cell called the Identity Management (IM) Cell was developed in release 1.7. This new cell contains Protected Health Information (PHI), which can be used to identify patients. The IM cell is used to manage this PHI in a manner consistent with the HIPAA privacy rule. The patient data will be available only as a HIPAA defined "Limited Data Set" to most of the hive.
The full functionality of the IM cell will be developed in stages. The initial framework and key services are released as part of the 1.7 release. Some of the key features being release in 1.7 are:
- New tables to store identifiers from different sites, and patients that are included in a project.
- Audit Controls are implemented that are in compliance with the HIPAA privacy rules.
- Services developed to set and validate an AES key for encrypting and decrypting patient MRNs in the IM cell.
- Unencrypted patient identifiers sent in the PDO can be processed through the IM cell to retrieve all site IDs for the patient and project.
In addition to the above features, the i2b2 Workbench (eclipse client) has two new views that were created to support the new IM cell. These new views, called Patient Mapping and Admin Tool are further defined in the following two sections called Patient Mapping View and Admin Tool View.
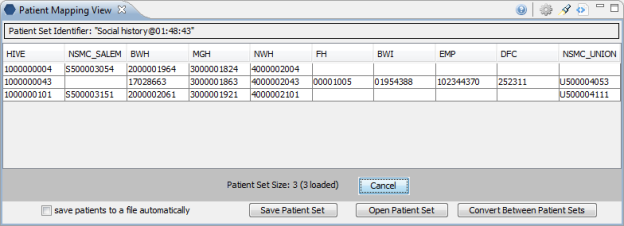
Patient Mapping View
The Patient Mapping View was created to allow Project Managers and Administrators to view all the different Medical Record Numbers (MRN's) for a single patient or a set of patients. In addition to viewing the mappings users can perform the following tasks in this view.
- Drag a patient to other views like the Query Tool and Workplace. Any one of the patients site MRNs can be used; it doesn't have to be their i2b2 Hive number.
- Save the patient mappings listed in the view to an external file.
- Import; you can use an external file to "import" the mappings into the view.
{info:title=Note}
The "import" in this view does NOT import the data into the i2b2 tables. It simply "imports" the data in the file to display in the view.
{info}
- Convert File will convert the patient IDs in an external file. In other words:
- If the ids in the file are encrypted you can decrypt them and save in a new file.
- If the ids in the file are not encrypted you can encrypt them and save in a new file.
Send PDO requests to the IM cell
In the Options dialog window there is an option to send the PDO request to the IM cell instead of to the CRC cell. The default is to send it to the CRC cell. If you would rather send it to the IM cell you can click on the Options button at the top of the view and click on the checkbox next to Sending PDO requests to IM cell.
{note:title=Important}
If you do choose to send the PDO requests to the IM cell you need to make sure you have set your project key. If this key is not set the IM cell will return an error saying: "Key not set".
See the next section, Admin Tool View for information on setting the project key in the i2b2 demo project; including the VM image.
{note}
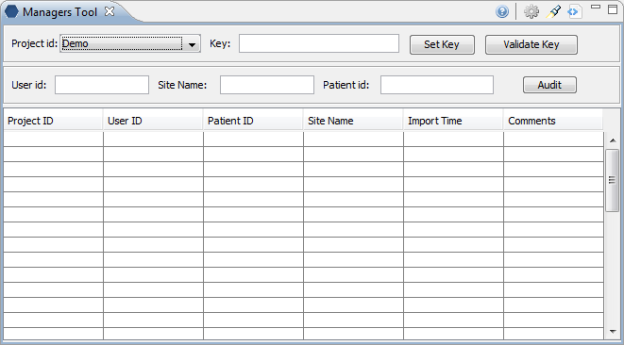
Managers Tool View
The Managers Tool view was developed in release 1.7 and works in conjunction with the IM Cell. It currently has two main functions.
- Set and / or validate that the project key is defined in the IM Cell.
- The project key is used by the IM cell to decrypt the patient id's that are encrypted.
- The Set Key is used to define the key in the IM cell.
- The Validate Key is used to verify the key is set.
{note:title=Important}
If you are using the IM cell and your patient identifiers are encrypted then you need to set the Project Key in the IM cell. It is important to note that if you restart your i2b2 server or in the case of the VM image restart the virtual machine you will need to re-enter the project key.
The project key for the i2b2 demo project is: i2b2demodatakey1
In the VM image you need to log into the i2b2 Workbench as the i2b2 Admin user.
User ID: i2b2
Password: demouser
{note}
- View the audit information.
- As part of the IM cell an audit table was created to track when a patient in the IM cell was accessed. This new view allows Project Managers or Administrators to run a report to see that audit information. The report can be run for a particular user, patient, or all audit information for the project you are logged into.
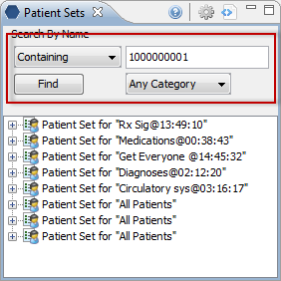
Patient Sets View
In release 1.7 a new view called Patient Sets was created. This new view will display a list of Patient sets that were created when a query was run. It is similar to the Previous Queries view except it only displays the patient sets and not the previous query or other results sets (i.e. Encounter sets, Number of patients, etc.).
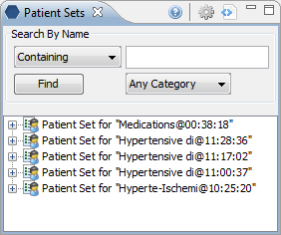
The Patient sets can be expanded to display a list of patients.
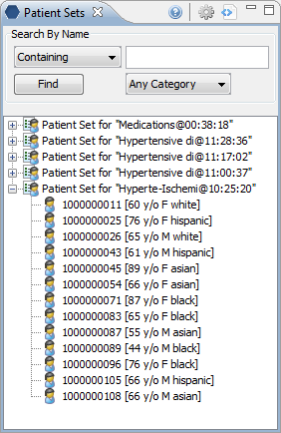
Users can drag an entire patient set or a single patient to other views in the i2b2 Workbench.
Users can also perform a search in which they can search by the name of the patient set or for a list of patient sets that contain a specific patient.
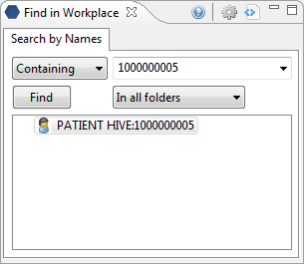
Workplace Find View
A new view called Find in Workplace was created in release 1.7. This view is very similar to the Find Terms view except it will search the Workplace view instead of Navigate Terms view.
Find Terms: New feature called "Jump to Term in Tree"
A new feature called Jump to Term in Tree has been added to the Find Terms view. Users can now easily jump directly to a term in the Navigate Terms view from the Find Terms view.
Once a term is found in the Find Terms view the user can click on the term using the right mouse button to display the pop-up menu. Selecting "Jump to Term in Tree" from the pop-up menu will bring the Navigate Terms view into focus and the hierarchical tree will automatically open to the location of the term selected in the Find Terms view.
OpenEMPI Support
OpenEMPI is an open source Enterprise Master Patient Index (EMPI) which is developed and supported by another community. The i2b2 IM cell has been developed to allow communication with OpenEMPI for those sites that choose to use it as their patient repository.
For additional information on OpenEMPI please see their website by going to the following location:
https://openempi.kenai.com/
PostgreSQL Database Support
The ability to use a PostgreSQL database as an i2b2 database has been added to release 1.7. Both the create and insert data database scripts for PostgreSQL are included in this release.
Updates
Data
New Tables
The following new tables were created as part of the new IM cell.
Table Name |
Description |
IM_MPI_DEMOGRAPHICS |
Contains general demographic information for the patients. |
IM_MPI_MAPPING |
Maps the patient's i2b2 number and their local MRN. |
IM_PROJECT_SITES |
Contains information about the different sites (Source Systems). |
IM_PROJECT_PATIENTS |
Stores the patients that are part of a project(s). |
IM_AUDIT |
Stores the audit details of patients accessed in the IM cell. This includes; the user, site, and project requesting the access as well the date in which it was accessed. |
New Columns
A new column called PROJECT_ID has been added to both the PATIENT_MAPPING and ENCOUNTER_MAPPING tables in the CRC. The PROJECT_ID was added to support the IM cell. It will allow sites to track which project a patient is part of.
New / Updated Demo Data
The PATIENT_MAPPING table in the CRC has been updated to include the following:
- Mappings of existing patients to multiple site MRNs.
- Project IDs added to patients.
Demo data has been added to all of the new IM tables except the AUDIT table. This data was added to support the new IM cell.
{note:title=Important}
The mapping information added to the CRC and IM tables in the i2b2 demo database is strictly for demonstration purposes and does NOT contain real patient information.
{note}
New Database Scripts
The database scripts for the i2b2 demo data have been updated to include the table creation and data insert scripts for the PostgreSQL database.
Documentation:
The 1.7 release documentation can be found in a zip file located on the i2b2 software web page. This file includes documentation for the following:
- The architecture, design, installation and messaging documents for the CRC, Ontology, File Repository, PM and Workplace Cells.
- The installation and developer's guide for the i2b2 Workbench.
- The startup guide for the web client.
- The data and hive installation guides.
- The VM Install document.
- The CRC Plug-in Analysis document.
- A process document for building queries from ontology terms.
- The architecture, design, installation and messaging documents for the Identity Management (IM) Cell. New
- The design documentation for the new Temporal Query Tool plug-in. New
- User guide for the new Temporal Query view New
- Documentation for the new views (Patient Set, Patient Mapping, Admin Tool, and Find in WorkplaceNew
Licensing
The i2b2 source code is licensed under the i2b2 Software License 2.1. This includes but is not limited to all code in the edu.harvard.i2b2.* package namespace.
Trademarks
Microsoft, Windows, Windows XP, Windows Vista, Windows 7 and Windows Server are either registered trademarks or trademarks of Microsoft Corporation in the United States and/or other countries.
Mac OS is a registered trademark of Apple, Inc.
Eclipse Galileo is a registered trademark of the Eclipse Foundation, Inc.
All other trademarks are the property of their respective owners.