Page History

...
Steps 1:
Set up a project project as documented here: Project Setup ... in
- Project Setup: Create a project. In this step, you define a project path which will be used to reference the project later. Finally add
2) Configure db look up parameters in the ADMIN TOOL:
ability to view current database connections defined in the DB_LOOKUP tables for each i2b2 cells. Administrators can also edit existing values and add new entries into the tables. This new feature resides within the i2b2 Admin Module. The DB_LOOKUP tables are specific to each i2b2 cell. To access the list of values in a specific cell you need to expand Manage Cells in the Navigation Tree on the left of the page. Then select the cell to expand further, once this is done you will see DB-Lookup as an option. Clicking on DB-Lookup will display the DBLookup List page. This page will display all the values in a table format.
3) Update DATASOURCE XML files IN WILDFLY IF NEEDED …
https://community.i2b2.org/wiki/display/OMOP/Configure+Data+Sources
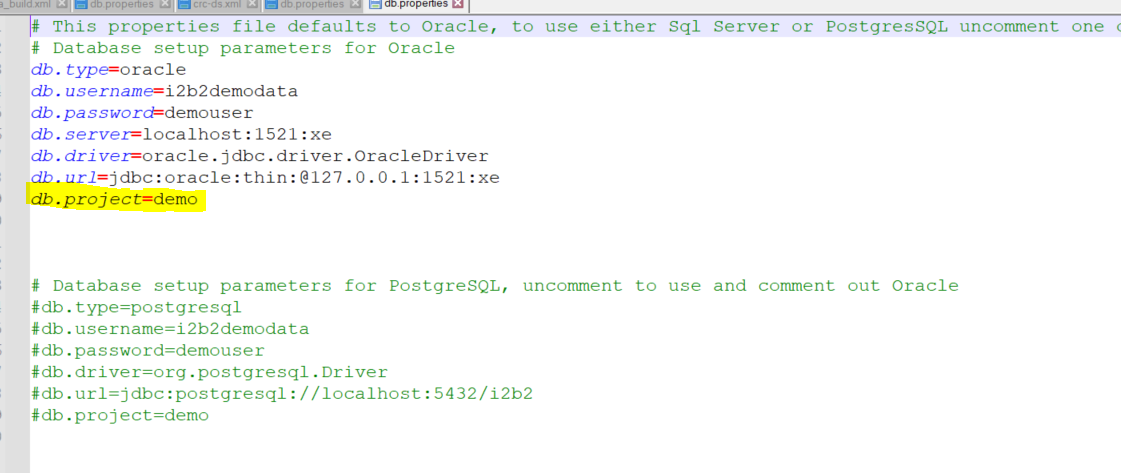
Step 4) Update CRC db properties file with the db parameters ( project parameter is used only used for loading demo data or other Ontologies) <<<<<
https://community.i2b2.org/wiki/display/getstarted/3.4.2+Set+Database+Properties
- When adding users to the project:
- Add the user AGG_SERVICE_ACCOUNT and assign it the role DATA_AGG.
- Add any regular users and assign them the role DATA_OBFSC
- When adding users to the project:
Step 2:
Update DB_Lookup tables to define the Wildfly XML datasource name for the project. Refer to 6.4.3 Cell DB-Lookup: for details.
| Info |
|---|
Ontology and Workplace cells can also be set up using Project Setup. |
Add new db_lookup entries for each of the core cells, to define how the project will connect to the db.
- The core cells are Ontology, CRC, and Workplace.
- In i2b2 1.7.13 and above, this step is more easily done directly in the database. Add entries to xxx_db_lookup, for each of ONT, CRC, and WORK.
- Add entries as below, with the project path you defined. It is easiest to copy these from an existing project.
| Info |
|---|
For ONT_DB_LOOKUP and workplace_db_look up, c_project path does not have a beginning backslash |
Step 3:
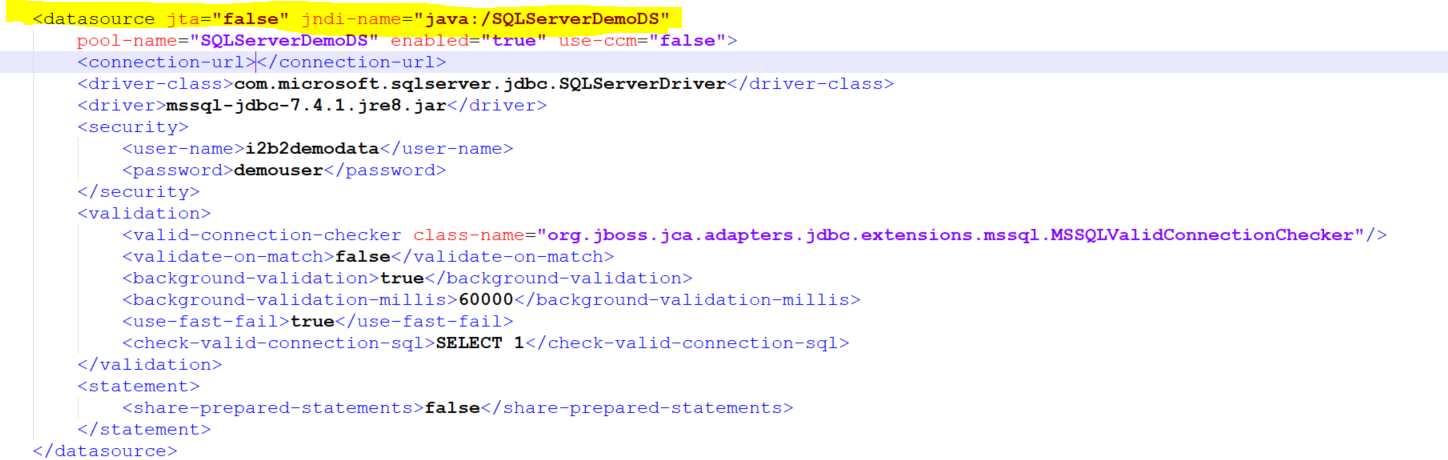
Update DATASOURCE XML files IN WILDFLY IF NEEDED. The data source is defined in the ds-xml file with parameters to connect to the hive and data tables.
i2b2 Server communicates with your i2b2db instance using ds.xml files. For detailed information refer to 2. Data Source Configuration

The datasource parameter value can be found in the CRC_DB_LOOKUP.C_DB_DATASOURCE (this is built at the time of datamart creation) to point to the datasource of your Crcdata tables location (star-schema and QT tables)
Example: SQL Server crc-ds.xml

| Info |
|---|
The pool-name parameter and the jndi-name value for the Bootstrap connection section should be set to constant value as CRCBootStrapDS The pool-name parameter and the jndi-name value for the db connection section should be set to the parameter DB_Lookup.C_DB_Data source value |
Step 4:
Load i2b2 tables into the database(s) used for the project as needed, making sure to update db properties file with the db parameters (e.g., 3.4 Crcdata Tables, 3.7.4 Load Metadata Tables). For example, you might specify an existing database in the ontology db-lookup, but a new database in the CRC db lookup. In this case, you only need to create/load the tables in the CRC database.
Step 5:
Finally add project users. Make sure to add AGG_SERVICE_ACCOUNT
https://community.i2b2.org/wiki/display/ServerSideDesign/Project+Setup