Page History
...
- Jboss has been upgraded to 7.1.1
- Apache Ant has been upgraded to 1.8.2
- Apache Axis2 has been upgraded to 1.6.2
...
| Warning |
|---|
...
|
...
|
...
Only the i2b2 Server was upgraded to use the above versions of Jboss, Ant, and Axis2. The i2b2 Workbench will continue to use the previous versions. As a result, the source codes for the server and the workbench client have different plug-ins for the commons. |
...
New Features
i2b2 release 1.7 contains many new features, all of which have been outlined below.
...
- Change Temporal Constraint to Define sequence of Events.
- Define Population in which events occur (optional step).
- Define Events
- Define order of events (temporal relationships)
- Run the query
...
| Info |
|---|
...
|
...
|
...
For detailed information about creating Temporal Queries please see the Temporal Query help file located on-line from within the i2b2 Web Client. |
{info}
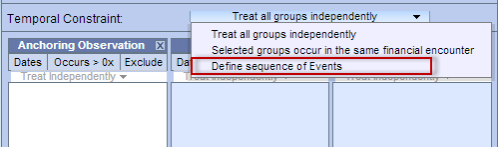
Step 1: Change Temporal Constraint
The first step is to change the Temporal Constraint to Define sequence of Events.
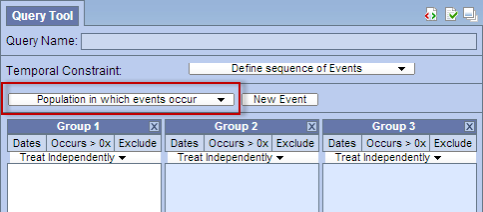
Step 2: Define Population in which events occur
Once you have changed the Temporal Constraint to be Define sequence of Events a new Page selection box will appear below the Temporal Constraint section. The default page will be Population in which events occur. It is on this page you will define your population requirements.
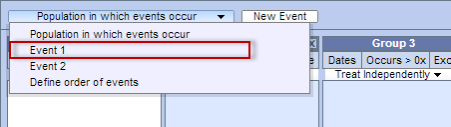
Step 3: Define Events
The events are the first component of a temporal query. There are no restrictions on the number of events you wish to define. The only requirement is that you have to define at least two events.
To define the events simply click on the Page selection box and select Event 1 from the drop-down list.
The groups and constraints for the events work in the same manner as they did for a traditional i2b2 query. Simply drag the items you want to include in Event 1 to the appropriate groups.
Once you have added your items to the groups you can click on the Page selection box and select Event 2 from the drop-down list. This will change the page to display the groups for Event 2.
If you need to add a third event you can click on the New Event button located next to the Page selection box.
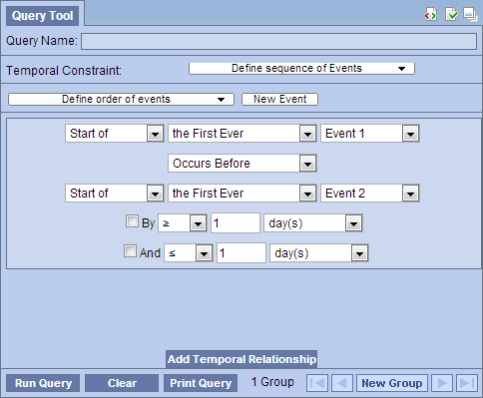
Step 4: Define Order of Events (Temporal Relationship)
As stated earlier the second component of a temporal query is the relationship between the events (temporal relationship). In the i2b2 Web Client this is done on the Define order of events page, which is accessed by clicking on the Page selection box and selecting Define order of events from the drop-down list.
The page will display as follows:
Step 5: Run Query
In the Web Client running a query works the same regardless of whether or not it is a Temporal Query or a traditional i2b2 query. By clicking on the Run Query button, the i2b2 client will send the request to the i2b2 server which will run the query as defined.
...
Each page as well as defining constraints is further defined in the next few sections.
{
| Info |
|---|
...
|
...
|
...
For detailed information about using the Temporal Query Tool view, please see the help file for this view which is located on-line from within the i2b2 Workbench. |
{info}
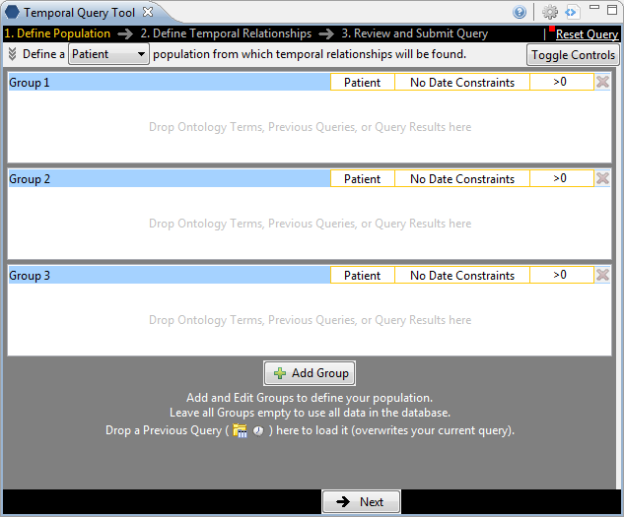
Page 1: Define Population
On this page you will define your population requirements.
Page 2: Define Temporal Relationships
As stated earlier there are two components to a temporal query; (1) List of events and (2) the relationship between the events.
The second page is where you will define both the events and their relationship.

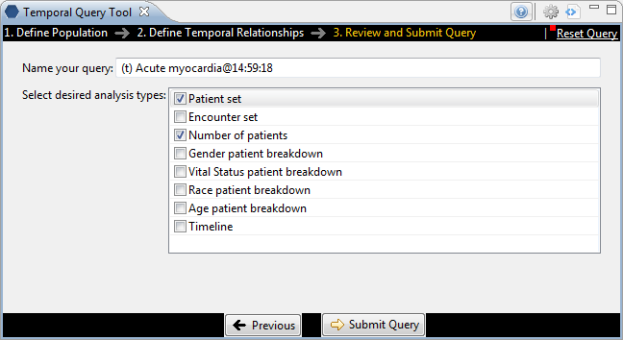
Page 3: Review and Submit
On this page the name of the query will default and if you wish to rename it you can do so at this point. Whatever is entered here will be the name given to the query when it is run. In addition you can select the Analysis Types that you want when running the query.
Defining Date Constraints and Exclusions in Temporal Query Tool View
There are some minor differences in terminology or layout that needs to be noted in this release notes.
Defining the Date Constraints:
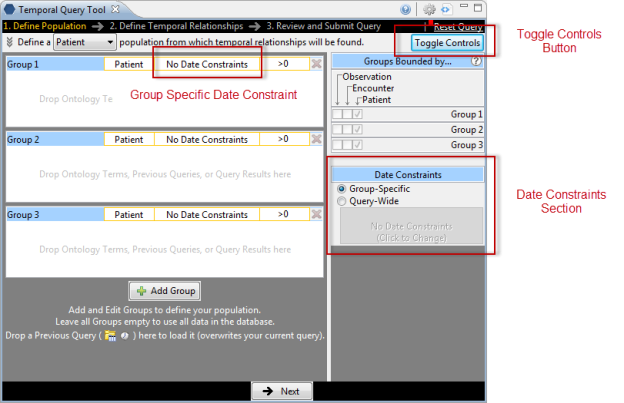
In the classic Query Tool view you can only define date constraints on the group / panel level. In the new Temporal Query Tool view you can now define a data constraint on either the query level or the group level. If you define it on the query level it will default the same date constraint for all the groups and the date constraint on the panel level will not be available for selection.
If you want to define it on the panel level select Group-Specific and then click on the column that say No Date Constraint in the group you wish to define the constraint.
...
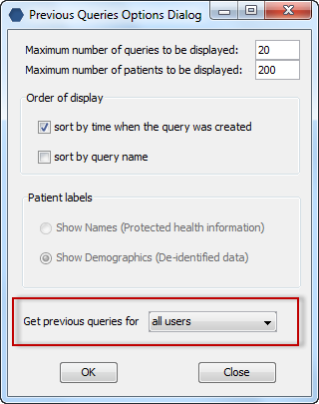
New in release 1.7 is the ability to filter the list of previous queries by the user who created the query. In the Options dialog ( ![]() ) window there is a new field called Get previous queries for user. The default is all users and can be changed to a specific user by clicking on the down arrow to display the drop-down list. Once you select the user and click on the OK button, the Previous Query view will refresh and display only those previous queries created by the selected user.
) window there is a new field called Get previous queries for user. The default is all users and can be changed to a specific user by clicking on the down arrow to display the drop-down list. Once you select the user and click on the OK button, the Previous Query view will refresh and display only those previous queries created by the selected user.
{
| Note |
|---|
...
|
...
|
...
In i2b2 only managers are allowed to view queries for another user, therefore this feature is only available to those users who have the role of MANAGER defined for the project. If a user does not have the manager role then this field will be inactive and unavailable for selection. |
...
Previous Query: Search Previous Queries View
...
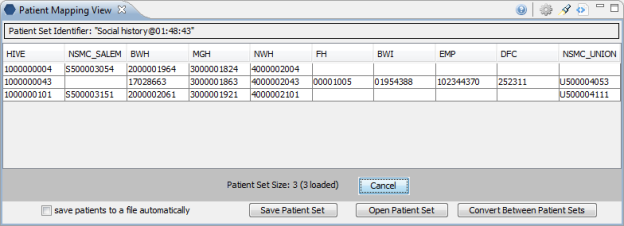
- Drag a patient to other views like the Query Tool and Workplace. Any one of the patients site MRNs can be used; it doesn't have to be their i2b2 Hive number.
- Save the patient mappings listed in the view to an external file.
- Import; you can use an external file to "import" the mappings into the view.
...
| Info |
|---|
...
|
...
|
...
The "import" in this view does NOT import the data into the i2b2 tables. It simply "imports" the data in the file to display in the view. |
...
- Convert File will convert the patient IDs in an external file. In other words:
...
Send PDO requests to the IM cell
In the Options dialog window there is an option to send the PDO request to the IM cell instead of to the CRC cell. The default is to send it to the CRC cell. If you would rather send it to the IM cell you can click on the Options button at the top of the view and click on the checkbox next to Sending PDO requests to IM cell.
{
| Note |
|---|
...
|
...
|
...
If you do choose to send the PDO requests to the IM cell you need to make sure you have set your project key. If this key is not set the IM cell will return an error saying: "Key not set". |
...
Managers Tool View
The Managers Tool view was developed in release 1.7 and works in conjunction with the IM Cell. It currently has two main functions.
...
- The project key is used by the IM cell to decrypt the patient id's that are encrypted.
- The Set Key is used to define the key in the IM cell.
- The Validate Key is used to verify the key is set.
...
| Note |
|---|
...
|
...
|
...
If you are using the IM cell and your patient identifiers are encrypted then you need to set the Project Key in the IM cell. It is important to note that if you restart your i2b2 server or in the case of the VM image restart the virtual machine you will need to re-enter the project key. |
...
- View the audit information.
...
Demo data has been added to all of the new IM tables except the AUDIT table. This data was added to support the new IM cell.
{
| Note |
|---|
...
|
...
|
...
The mapping information added to the CRC and IM tables in the i2b2 demo database is strictly for demonstration purposes and does NOT contain real patient information. |
...
New Database Scripts
The database scripts for the i2b2 demo data have been updated to include the table creation and data insert scripts for the PostgreSQL database.
...