The Previous Queries panel displays queries run by a user, with the most recently run queries displaying first. A previous query can be reused by dragging it into the 'Query Name' box or into a group in the 'Query Tool' panel.
The 'Previous Queries' panel contains two tabs:
- 'Previous Queries' tab: shows previous queries by descending order of time.
- 'Find' tab: allows user to search for a previous query.
Previous Queries tab
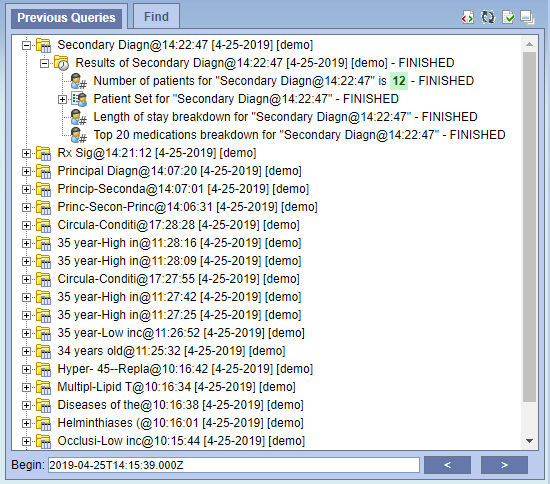
The 'Previous Queries' tab displays a list of all queries run by a user, with the most recent ones at the top. It also displays information about the query, which can be viewed by clicking ![]() .
.
The information displayed depends on the options selected in the popup 'Run Query' box when the query was created.
To expand the size of the panel, click on the square widget in the top right corner of the panel.
To view more than the default of 20 queries, click on the widget with the check mark.
To refresh the 'Previous Queries' tab, click on the refresh widget.
Find Tab
The 'Find' tab allows users to search for previous queries.
Navigation
Rename a Previous Query
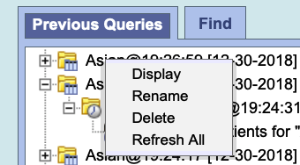
Users can rename a previous query from the list by selecting Rename from the popup menu.
- Using the right mouse button, click on the Previous Query to be renamed.
- A pop-up menu will open.

- Select Rename from the list.

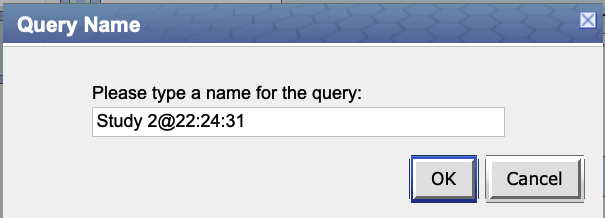
- The rename query dialog box will open.

- Enter the new name of the previous query and click on the OK button.
- The previous query will now display in the view with the new name.
NOTE: When dragging a previous query to another view the new name will appear when it is dropped. |
Delete / Remove a Previous Query
Users can rename a previous query from the list by selecting Delete from the pop-up menu.
- Using the right mouse button, click on the Previous Query to be deleted.
- A pop-up menu will open.
- Select Delete from the list.

- A message box will open asking if you are sure you want to delete the query.

- Click on the OK button to delete the query
WARNING: Once you click on Delete, the previous query will be removed from the view and there is no way to restore it. Therefore you need to make sure you want to remove it from the list. |
Refresh the List
Users can refresh the list of previous queries from the list by selecting Refresh All from the pop-up menu.
- Using the right mouse button, click on any of the previous queries in the list.
- A pop-up menu will open.
- Select Refresh All from the list.
- The list of previous queries and their status will be refreshed.
Options
Users can define how many previous queries to display and the order in which they will appear in the list. The display options are set in the Options for Previous Queries window, which can be accessed by clicking on the Show Options button ( ).
).

Maximum to Display
Queries to Display
The Maximum number of queries to display defines how many previous queries will be visible in the Previous Query view. Once the maximum number is reached the oldest query will no longer appear in the view.
TIP: Recommendation: Use the Workplace view to save those previous queries that will be used often. In addition to being more convenient it will also prevent you from loosing a common query if the maximum number to display has been reached. |
Sort Queries
Sort by Create Date
Selecting to sort By Create Date will sort the queries in the Previous Query view by the date and time the query was created. Once you select to sort by the creation date, you need to define whether or not it will be in ascending or descending order.
Ascending: displays the oldest query first.
Descending: displays the newest query first.
NOTE: Renaming a query will not affect the sort order as the date and time is stored with the previous query. |
Sort by Name
Selecting to sort By Query Name will sort the queries in the Previous Query view alphabetically by the name of the query. Once you select to sort by name, you need to define whether or not it will be in ascending or descending order.
Ascending: queries are displayed in alphabetical order with the beginning of the alphabet at the beginning of the list. (A to Z)
Descending: queries are displayed in alphabetical order with the beginning of the alphabet at the end of the list. (Z to A)
Using a Previous Query
This section describes how to use a previous query.
Draggable Items
Different parts of the previous query can be dragged and dropped (copied) from the Previous Query view to other views in the i2b2 Web Client.
- Previous Query
Associated with each previous query ( /
/  ) are the items used to run the query, any constraints that were defined, and the results. A previous query can be added to other views by dragging the previous query name from Previous Query view to one of the following views.
- Query Tool view; drop in the panel or Query Name.
- Workplace view; drop in a user or shared folder
- Patient Set
A specific set of patients can be added to other views by dragging the Patient set ( ) from Previous Query view to one of the following views.
- Query Tool view; drop in the panel.
- Workplace view; drop in a user or shared folder
- Encounter Set
A specific set of encounters (visit list) can be added to other views by dragging the Encounter Set () from Previous Query view to one of the following views.
- Query Tool view; drop in the panel.
- Workplace view; drop in a user or shared folder
Add to Query Tool View
The Query Tool view is designed to simplify the process of retrieving information from the database associated to the i2b2 Web Client.

Within the Previous Query view there are several items that can be used in the Query Tool view to run a query. The following sections explain how to add the previous query, patient set and encounter set to the Query Tool view.
Add Previous Query to Query Tool View
Within the Query Tool view, a previous query can be added to one of the following two locations.
| Query Name field | The items and constraints from the original query will be used to create a new query. This information can be edited to make a new query or can be used as is to run the query again. |
| Panel (Group) | Used within a new query (query-in-query). The information associated with the previous query can not be edited. Add additional search criteria (items) to be used in the new query. |
Add Previous Query to the Query Name (New Query)
- Highlight the previous query ( / ) by clicking on the name of the query.
- While holding the left mouse button down, drag the item to the Query Tool view.
- Drop the item into the Query Name field.
- The item(s) associated with the previous query will display in the appropriate group(s), the name of the query will appear at Query Name, and any constraints that were defined when the original query was run will now default with the new query.

NOTE: When you run the query it will receive a new name. This is to distinguish the first previous query from the second. |
Add Previous Query to the Query Name (Query-in-Query)
- Highlight the previous query ( / ) by clicking on the name of the query.
- While holding the left mouse button down, drag the item to the Query Tool view.
- Drop the item into the Query Name field.

- The previous query will now display in the panel for Group 1.

Add Patient Set to the Query Tool View
- Click on the plus sign (
 ) next to the name of the previous query that contains the patient set.
 - Click on the plus sign () next to the results folder.
- Highlight the Patient set () by clicking on its name.
- While holding the left mouse button down, drag the item over to the Query Tool view
- Drop the item into the panel labeled Group 1.

- The item will now display in the panel for Group 1.

Add Encounter Set to the Query Tool View
- Click on the plus sign () next to the name of the previous query that contains the encounter set.
- Click on the plus sign () next to the results folder.
- Highlight the Encounter set () by clicking on its name.
- While holding the left mouse button down, drag the item over to the Query Tool view
- Drop the item into the panel labeled Group 1.

- The item will now display in the panel for Group 1.

Add to Workplace View
Information in the workplace is related to the most common concepts and queries that an individual uses and in essence becomes their personal workplace.

Add Previous Query to Workplace View
- Highlight the previous query ( / ) by clicking on the name of the query.
- While holding the left mouse button down, drag the previous query name to the Workplace view.
- Drop the previous query into either your workplace folder or the shared folder.

- The previous query will now appear in the workplace with the same name.

Add Patient Set to Workplace View
- Click on the plus sign () next to the name of the previous query that contains the patient set.
- Click on the plus sign () next to the results folder.
- Highlight the Patient set () by clicking on its name.
- While holding the left mouse button down, drag the Patient set to the Workplace view.
- Drop the Patient set into either your workplace folder or the shared folder.

- The Patient set will now appear in the workplace.

Add Encounter Set to Workplace View
- Click on the plus sign () next to the name of the previous query that contains the encounter set.
- Click on the plus sign () next to the results folder.
- Highlight the Encounter Set () by clicking on its name.
- While holding the left mouse button down, drag the Encounter set to the Workplace view.
- Drop the encounter set into either your workplace folder or the shared folder.

- The encounter set will now appear in the workplace.