Overview
Search
Users can search for patients via Medical Record Numbers (MRNs), and search for studies via these patients or, alternatively, Accession Numbers (ANs). Both of these search tasks follow the same communication diagram below.

In mi2b2 client's Tab 1, users can enter a list of MRNs and search on the PACS to find the list of corresponding patients. Once the list of patients is found, users can use these patients to find a set of DICOM studies corresponding to these patients. Alternatively, if the users already have a list of ANs, they can enter them in Tab 2 and search on the PACS for these studies. Finally, after a list of studies is obtained, users can select the desired ones and request the studies to be copied to the remote cache. The request adhers to the following diagram.
Request
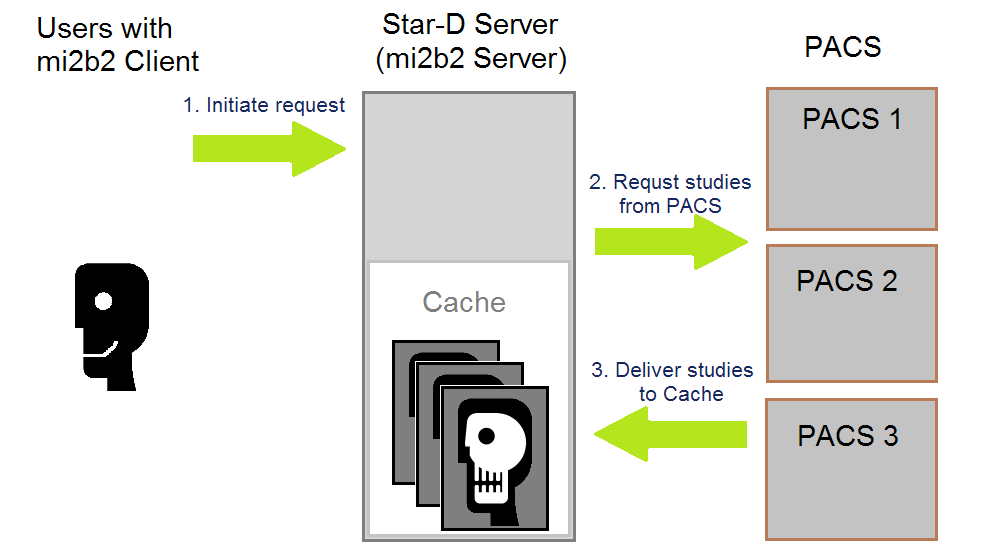
The mi2b2 client sends requests to the mi2b2 server, which, in turn, asks the PACS to copy these studies into mi2b2 server's own cache. The copying of studies is done via the DICOM C-Move directive, and is executed asynchronously by the mi2b2 server. Because accessing clinically utilized PACS may impact their performance, mi2b2 is typically configured to only access these PACS during downtime (when volume of clinical use is low). As such, the time it takes to fulfill each request is highly dependent upon the mi2b2 server's configuration, PACS access policy, load, and availability. Once the studies are available in the mi2b2 cache, users can later download them onto their own local machine.
View Request

As the transferring of studies from PACS to mi2b2 server is asynchronous, users can check the request status by asking the mi2b2 server. This is executed whenever user visits Tab 3 or click on Tab 3's "refresh" button.
Search by Medical Record Numbers (MRNs)
If you have a list of MRNs, you can search for studies of the patients with these MRNs.
Initialization
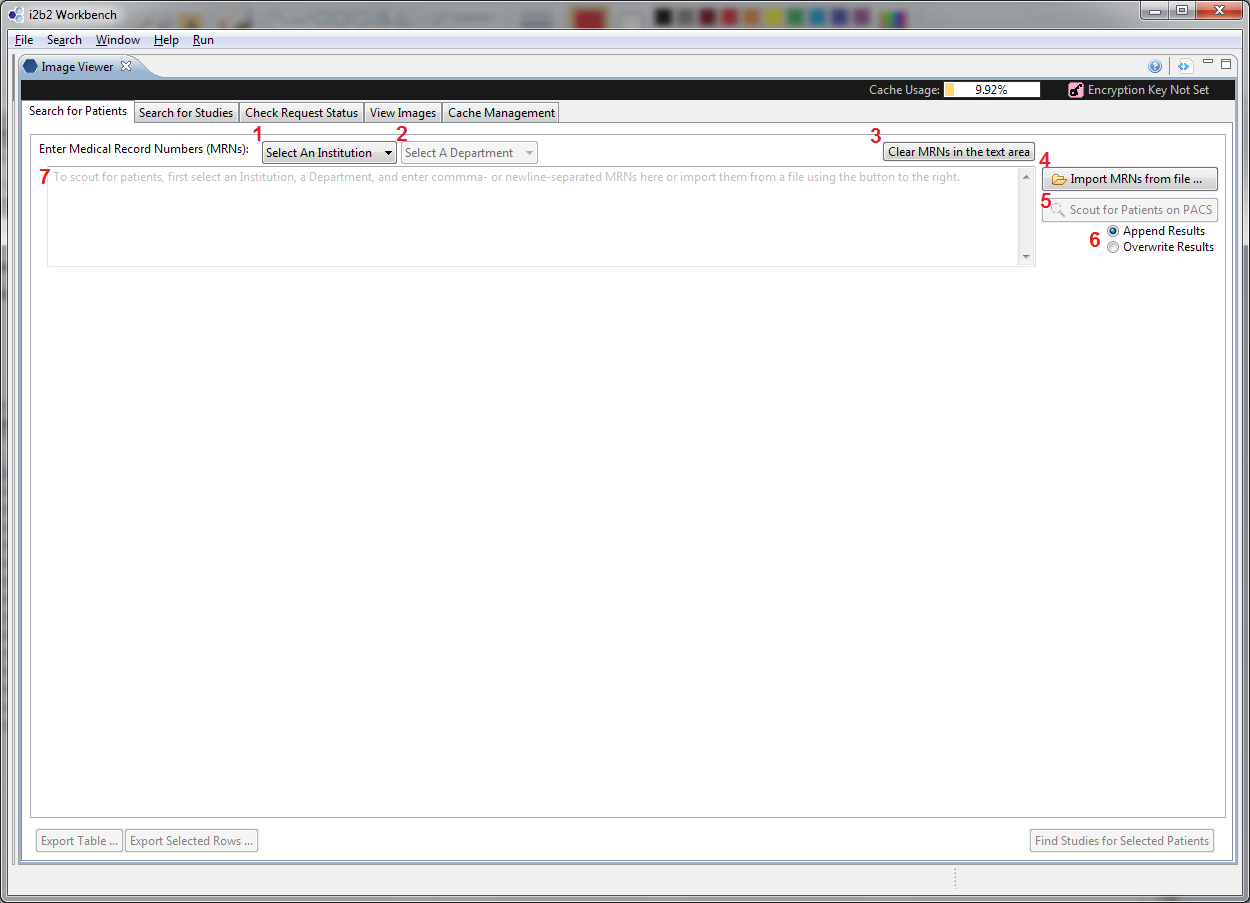
This is a screenshot of the mi2b2 client's Tab 1 at the start.
- (Select an Institution) Users must first select an institution and an institution against whose PACS the search will be performed.
- (Select a Department) Once an Institution is selected, the department dropdown box becomes active. The default value is "All Departments".
- (Clear MRNs in the Text Area) Users can clear the values in the current text box by clicking on this button
- (Import MRNs from a File) Users can import MRNs stored in a text file (.txt). The MRNs must be comma- or newline- separated.
- (Scout for Patients with the MRNs in the Text Area) Click this button to execute the search. This button is only activated when there are MRNs in the text area, and an institution and a department have been appropriately selected.
- (Append or Overwrite the Result Table) Users can designate whether the results of the next "Scout for Patients" action will append to the current result table, or overwrite it.
- (MRN Text Area) This is the text area where users can enter MRNs directly.
After Scouting for Patients

After scouting has been performed, the results are shown in a table. If "Append" has been selected, the results would be added to the existing table. If "Overwrite" has been selected, the results would overwrite the existing table. Additional buttons are also activated.
- (Scout Statistics) mi2b2 client reports how many patients are in the current table. The number of newly patients found in the last scout is listed in parentheses. Statistics of the MRNs submitted in the last search is also reported. Links are provided to view MRNs that are duplicates or not found. Users can use the links to examine these MRNs and export them.
- (Selection Controls) Users may use "Select All" and "Flip Selection" to select patients listed in the table. By default, all results are selected.
- (Toggle Filters) Users can toggle show/hide filter controls. Filter controls allow users to refine the results shown in the table. All filtering actions are performed on the client side exclusively.
- (Result Table) Results of the scout is shown in this table. Each row contains a patient. If more than one patient share the same MRN, then these patients show up as a single entry with an expandable button (see the patient with MRN = 4). Users can see all patients by clicking on the expand button. Users can sort by MRNs (cycling through ascending/descending/original order) by clicking on the MRN column header. However, this is the only column users can sort by.
- (Export Table Content) Users can export the entire content of the table or the selected rows by using these buttons. The content is exported to a text file (.txt).
- (Find Studies for Selected Patients) After selecting patients of the right gender and age, users can click on this button to ask mi2b2 to retrieve a list of studies associate with these patients. This button will transition users to Tab 2 (see below).
Search by Accession Numbers (ANs)
Users are transitioned to this tab after selecting "Find Studies for Selected Patients" from Tab 1. Alternatively, users can directly enter this tab (by selecting the tab), and enter a list of ANs to search for studies.
Initialization

This is a screenshot of the mi2b2 client's Tab 2 at initialization. The layout and functionality are similar to that of Tab 1. The only difference is that in Tab 1, the user inputs are MRNs, and here the user inputs are ANs.
- (Select an Institution) Users must first select an institution and an institution against whose PACS the search will be performed.
- (Select a Department) Once an Institution is selected, the department dropdown box becomes active. The default value is "All Departments".
- (Clear ANs in the Text Area) Users can clear the values in the current text box by clicking on this button
- (Import ANs from a File) Users can import MRNs stored in a text file (.txt). The ANs must be comma- or newline- separated.
- (Find Studies with the ANs in the Text Area) Click this button to execute the search. This button is only activated when there are ANs in the text area and an institution and a department have been appropriately selected.
- (Append or Overwrite the Result Table) Users can designate whether the results of the next "Find Studies" action will append to the current result table, or overwrite it.
- (AN Text Area) This is the text area where users can enter ANs directly.
After Searching for Studies
Users can get to this point either from "Find Studies for Selected Patients" in Tab 1 or by Find "Studies with the ANs in the Text Area" in Tab 2.

After searching for studies has been performed, the results are shown in a table. If "Append" has been selected, the results would be added to the existing table. If "Overwrite" has been selected, the results would overwrite the existing table. Additional buttons are also activated.
- (Search Statistics) mi2b2 client reports how many studies are in the current table. The number of newly added studies found in the last search is listed in parentheses. Statistics of the MRNs or ANs submitted in the last search is also reported. Links are provided to view MRNs or ANs that are duplicates or are not found. Users can use the links to examine these MRNs and export them.
- (Selection Controls) Users may use "Select All" and "Flip Selection" to select studies listed in the table. By default none of the studies are selected.
- (Toggle Filters) Users can toggle show/hide filter controls. Filter controls allow users to refine the results shown in the table. All filtering actions are performed on the client side exclusively.
- (Result Table) Results of the scout is shown in this table. Each row contains a patient. If more than one patient share the same MRN, then these patients show up as a single entry with an expandable button (see the patient with MRN = 4). Users can see all patients by clicking on the expand button. Users can sort by MRNs (cycling through ascending/descending/original order) by clicking on the MRN column header. However, this is the only column users can sort by.
- (Export Table Content) Users can export the entire content of the table or the selected rows by using these buttons. The content is exported to a text file (.txt).
- (Request Selected Studies) After selecting the desired studies, users can click on this button to ask mi2b2 to obtain a copy of these studies and transfer them to the remote cache (on mi2b2 server). Clicking this button will transition users to Tab 3 (see below).