Page History
There are a few parameters that need to be defined in the i2b2 Admin if you want to use Active Directory services as your i2b2 authentication method. i2b2 supports NTLMv1, NTLMv2 authentication protocols, and OKTA authentication.
The required parameters are listed in the following tables depending on the type of protocol used.
NTLMv1 authentication:
Parameter Name | Values | Required |
|---|---|---|
authentication_method | NTLM | Yes |
domain | Example: i2b2.org | Yes |
domain_controller | Example: pdc.i2b2.org | Yes |
NTLMv2 authentication:
Parameter Name | Values | Required |
|---|---|---|
authentication_method | NTLM2 | Yes |
domain | Example: i2b2.org | Yes |
domain_controller | Example: pdc.i2b2.org | Yes |
OKTA authentication:
Parameter Name | Values | Required |
|---|---|---|
authentication_method | OKTA | Yes |
domain | Example: i2b2.org | Yes |
domain_controller | Example: pdc.i2b2.org | Yes |
In the i2b2 there are different types of parameters that can be defined.
Individual users log in using Active Directory services
- In this scenario, not all users are affected.
- Only those users who have the parameters defined with being required to use their domain (network) id and password to log into i2b2 Web Client, Workbench, and Admin (if they have access).
- Users who do not have the parameters defined will log in using the standard i2b2 authentication method.
- Type of Parameter: User parameter
- The parameters are defined on the user level.
- User parameters only affect the user in which they are entered on.
| Info | ||
|---|---|---|
| ||
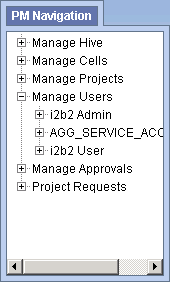
For those who are not familiar with the i2b2 Admin, here is a quick note on how to navigate around the pages. For the most part, the i2b2 Admin is comprised of two panels. The panel on the left is the Navigation panel and contains a number of items that are displayed in a hierarchical tree. These items are grouped together based on their function. (Manage Hive, Manage Cells, Manage Projects, Manage Users) The information that displays in the panel on the right is driven by whatever item is selected in the Navigation panel. If you click on Manage Users the Manage Users page will display on the right. If you click on a user name in the Navigation panel the Edit User page will display. |
Steps to Setup Active Directory Parameters
Assumption: The following steps assume you are already logged into the i2b2 Administration Module. If you do not know how to login please see the chapter titled i2b2 Administration Module Install.
| Warning | ||||||||||
|---|---|---|---|---|---|---|---|---|---|---|
| ||||||||||
The below steps are written for adding a user parameter. If you wish to add a hive parameter you can interchange the first three steps with the following two steps:
At this point the steps for adding a parameter are the same so can continue entering your parameters by jumping to the 4th step. |
| indent | ||
|---|---|---|
| ||
1. In the Navigation panel, expand Manage Users to display a list of users. |
| indent | ||
|---|---|---|
| ||
| indent | ||
|---|---|---|
| ||
2. Expand the name of the user you want to configure for Active Directory Authentication. |
| indent | ||
|---|---|---|
| ||
3. Click on the Params option that displays under the user's name. |
| indent | ||
|---|---|---|
| ||
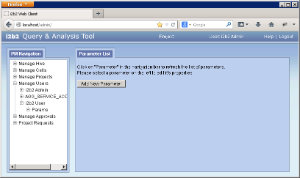
4. The Parameters List page will display on the right side of the windowpane. |
| indent | ||
|---|---|---|
| ||
| indent | ||
|---|---|---|
| ||
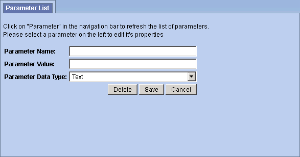
5. Click on Add New Parameter. The Enter Parameter page will display. |
| indent | ||
|---|---|---|
| ||
| indent | ||
|---|---|---|
| ||
6. Enter the following parameter to define the method of authentication. |
| indent | ||
|---|---|---|
| ||
Parameter Name: authentication_method |
| indent | ||
|---|---|---|
| ||
Parameter Value: NTLM ( for using NTLMv1 protocol) NTLM2 ( for using NTLMv2 protocol) OKTA (for using OKTA authentication) |
| indent | ||
|---|---|---|
| ||
Parameter Data Type: Text |
| indent | ||
|---|---|---|
| ||
7. Click on Save to save the new parameter. |
| indent | ||
|---|---|---|
| ||
8. The Parameters List page will display with the new parameter. |
| Info | ||
|---|---|---|
| ||
The Navigation panel will not automatically refresh to display the new parameter. If you wish to update the list in the Navigation panel you can click on Params and it will refresh the hierarchical tree. |
| indent | ||
|---|---|---|
| ||
9. In the Parameters List page click on Add New Parameter to enter another parameter. |
| indent | ||
|---|---|---|
| ||
10. Enter the following parameter for the PDC domain of your company's NT domain. |
| indent | ||
|---|---|---|
| ||
Parameter Name: domain |
| indent | ||
|---|---|---|
| ||
Parameter Value: YOUR_PDC_DOMAIN |
| indent | ||
|---|---|---|
| ||
Parameter Data Type: Text |
| indent | ||
|---|---|---|
| ||
11. Click on Save to save the new parameter. |
| indent | ||
|---|---|---|
| ||
12. In the Parameters List page click on Add New Parameter to enter another parameter. |
| indent | ||
|---|---|---|
| ||
13. Enter the following parameter for the connection URL of your company's NT domain. |
| indent | ||
|---|---|---|
| ||
Parameter Name: domain_controller |
| indent | ||
|---|---|---|
| ||
Parameter Value: YOUR_NT_IP/HOST_DOMAIN |
| indent | ||
|---|---|---|
| ||
Parameter Data Type: Text |
| indent | ||
|---|---|---|
| ||
14. Click on Save to save the new parameter. |
| indent | ||
|---|---|---|
| ||
15. The Parameters List page will display all the new parameters you have entered. |
| indent | ||
|---|---|---|
| ||
16. In the Navigation panel click on Params to refresh the hierarchical tree and display the new parameters. |


