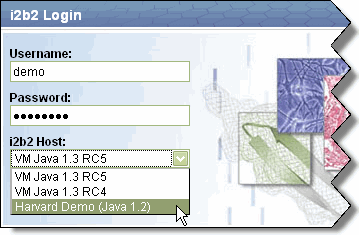
Displaying connection records in the login screen

This document was created as an overview on how to quickly install the i2b2 Web Client. The author(s) assume that the reader is an experienced software developer or architect who has some experience programming JavaScript and some knowledge of advanced JavaScript topics such as JSON, AJAX, and using JavaScript toolkit (APIs).
Setting up the web client is a relatively simple process. First, the files need to be copied to your web server.
|
Web servers verified to be compatible with the web client as of January 2009 include Microsoft IIS and Apache. |
After copying the files, you need to locate your proxy server. As described in the document called "Web Client Directory Structure", the proxy server must have the exact same base URL address (including port number) that is used to load the initial default.htm file into the browser.
Included in the code distribution is index.php which can act as a simple proxy for use in a PHP-enabled Apache web server. This proxy file requires PHP to be compiled with XML support (default setting in most Linux distributions). Within the PHP file are 2 arrays representing a white-list and black-list that are used to restrict all requests from connected web clients to only the IP addresses that the cells are located at.
$WHITELIST = array( |
If you are not running the web client on the Apache web server, you can delete the index.php file. There is also a prototype proxy that does not require the XML support to be compiled into the PHP interpreter.
The web client uses JSON -standardized configuration files that are loaded when it is first loaded. The most important of those configuration files is the connection configuration file called i2b2_config_data.js and is located in the root directory of the distribution package. Set the urlProxy value to point to the publicly accessible URL of your web Proxy as shown below.
{ |
Also in the connection configuration file are records describing connections to various i2b2 Hives and/or i2b2 projects. The simple connection configuration that can be used defines domain, name and urlCellPM attributes.
Attribute |
Description / Usage |
domain |
Used to specify the i2b2 domain / group. |
name |
The text that will be displayed to the user in the drop down box of the login page. |
urlCellPM |
Specifies the location of the PM Cell to be used for the user authentication process and to log into the hive. |
{ |
Displaying connection records in the login screen |
|