Page History
a. Quick Start
b. What is a Query?
i. Definition of a Query
ii. Life Cycle of a Query
iii. Results of a Query
1) Patient Number is the default result
2) Other Options are available (see ......)
3) Detailed medical data are not part of the results the Query Tool can provide. Other steps are required.
C. Building a New Query
i. Including Terms
1) Dragging and Dropping
2) Including a Previous Query
3) Including a Query Result (Patient Set/ Patient)
4) Including a Folder in Workplace
ii. AND/OR Operators
iii. How to use a lab test (terms with values)
iv. Run Query and Clear buttons
D Resetting the Query Tool (Clear)
E. What Happens when a query gets queued?
F. Rerun a Previous Query
G. Advanced Query Options
i.Output Options
1) Patient Set
2) Encounter Set
3) Number of Patients
4) Gender Patient Breakdown
5) Vital Status Patient Breakdown
6) Race Patient Breakdown
7) Age Patient Breakdown
8) Timeline
9) Length of Stay Breakdown
10) Top 20 Medications Breakdown
12) Top 20 diagnoses Breakdown
13) Inpatient and Outpatient Breakdown
ii. Managing Groups
1) Additional Groups
2) Shifting Group Order
3) Delete Groups
iii. Specifying Constraints
1) Date Constraints (Panel-level and Term-level)
2) Negation (Exclude)
3) Occurrences
iv. Value Constraints
v. Modifiers
1) What are they?
2) Has Value Constraints like Labs
3) How are they represented in Navigate/Find Terms
- Modifier
- Modifier Container
vi. Query Timing
1) Treat all groups independently (default)
2) Select Groups occur in the same financial encounter
3) Define sequence of events (Temporal Query)
- Simple
- Advanced
- Some Concepts do not make sense here (Put them in the Population )
| Excerpt | ||||||
|---|---|---|---|---|---|---|
The Query Tool panel is where queries are constructed and run.
|
3.1 Layout
- Panel Options allow users to (1) view the XML exchange between the client and the i2b2 server (if enabled) , (2) set options for the panel, and (3) resize the panel.
- Query Name Display shows the name of the current query. Users can also drop a previous query here to load it.
- Query Timing Selector enables users to select the appropriate timings for their query, including temporal queries.
- Query Groups are where users can drag and drop terms to build queries. There are initially three Groups, but more can be added.
- Tool Bar contains buttons to run queries, clear all the panels, add new panels, and navigate between panels.
3.2 Creating a Query
3.2.1 i2b2 Items for Querying
These items may be dragged into Query Groups to construct queries.
| Icons | Names | Description |
|---|---|---|
| Terms | Terms (also called concepts) are the words or phrases that make up vocabularies. Terms are the basic query items. | |
| Term Groups | Related terms are grouped into hierarchies. When a term group is used in a query, all terms in the group are searched for. | |
| Modifiers | Modifiers are descriptors that can be attached to terms to make small changes to them. For example, a Diagnosis concept may be additionally described by Modifiers "Principal Diagnosis" or "Secondary diagnosis." | |
| Modifier Groups | Groups of Modifiers, similar to Term Groups. | |
/ | Previous Queries | Previous Queries are queries that have been run before and are stored in the 'Previous Queries' panel. |
| Individual Patients | If selected when running a query, a query can return a Patient Set,which is a set of patient numbers that satisfy the query criteria. The Patient Set is stored with the query in the Previous Queries panel. The Patient Set can be expanded, and individual subjects dragged into query groups to be used in a new query. | |
| Patient Sets | If selected when running a query, a query can return a Patient Set, which is a set of patient numbers that satisfy the query criteria. The Patient Set is stored with the query in the Previous Queries panel and can be dragged into query groups to be used in a new query. | |
| Encounter Sets | If selected when running a query, a query can return an Encounter Set, which is a set of encounter numbers that satisfy the query criteria. The Encounter Set is stored with the query in the Previous Queries panel and can be dragged into query groups to be used in a new query. |
3.2.1 Operators and Order of Precedence
i2b2 items are combined using Boolean operators AND and OR.
Items within each Group are first ORed together. The Groups are then ANDed together.
Example 1 (AND): This query finds patients with Acute Myocardial Infarction AND Angina Pectoris.
Example 2 (OR): This query finds patients with Acute Myocardial Infarction OR Angina Pectoris.
Example 3 (AND of ORs): This query finds patients with (Acute Myocardial Infarction OR Angina Pectoris) AND who are male.
*Note that the OR expression in the parentheses is evaluated first.
3.2.2 Constraints
Constraints are used to narrow down the search criteria to a particular time frame, number of occurrences or a specific value or range of values. In i2b2, there are several types of constraints that can be defined in the Query Tool view.
- Group Constraints
- Date Constraint
- Setting Date Constraint for the entire Group
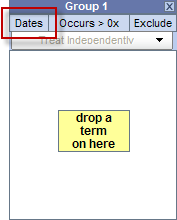
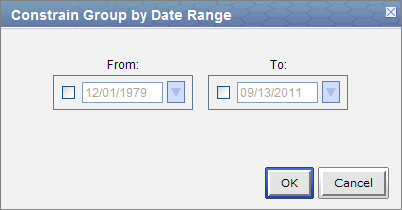
Clicking on 'Dates' will display a dialog box in which a date range can be selected to restrict the occurrences of the items in the Group to within that range. Check one or both of the check boxes to indicate whether there is a begin date (From) or an end date (To) or both.
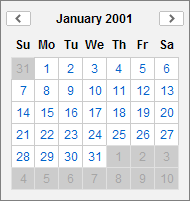
Then type the date directly in the text box or click on the drop-down arrow to open the calendar below to select a date. This will set the date range for all items in this Group. - Setting Date Constraint on individual items.
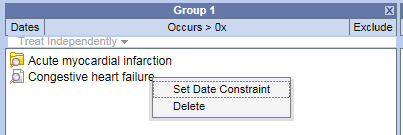
Sometimes only some items in the Group need date constraints or different items in one group require different date constraints. In this case, right click on an item and select Set Date Constraint to set the date constraint for that item specifically. - Once a date constraint is applied, Dates will now be underlined to indicate a date constraint has been set.
- Setting Date Constraint for the entire Group
- Occurrence Constraint
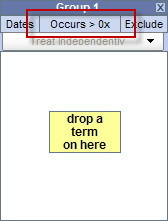
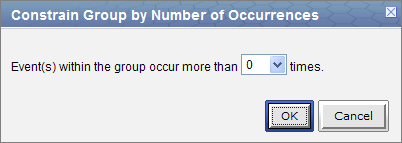
Users can define the number of times an item must occur for each subject.
Click on 'Occurs>0x'
A new window will open
Click on the drop-down arrow to display a list of numbers.
Select a number from the list.Click on the OK button.
Occurs > 0x will now be underlined to indicate a constraint has been set and the 0 will be replaced with the selected number.
Note that if there are multiple items in the panel, patients are counted if any single item has more than the number of occurrences selected. The logic is: Term A (2+ occurrences) OR Term B (2+ occurrences) OR Term C (2+ occurrences).
- Exclusion
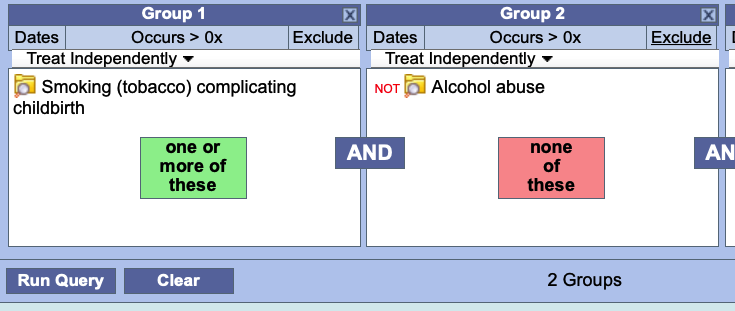
Constraint will not include patients with the concepts listed in the panel.Click on the Exclude button located in the selection criteria section of the panel.
The text in the information box will change to "none of these" and the background color will change to pink.
- Value Constraints (eg. labs)
Constraint is by the value associated to a concept or modifier. Not all items have values. The value constraint window will open automatically when you drop a concept into a panel in the Query Tool view. To set the constraint at a later time, right click on the item in the panel and select Set Value.- Numeric
The numeric value is defined in the source system when the result is entered. Enter a numerical value at the Please enter a value field.
Unlike flag and text values, numeric values use operators, such as greater than or less than when setting the constraints.
The Units will default to the normal units defined for the item. Click on the drop-down arrow to change the units.
(In order for unit conversion to work a parameter called CRC_ENABLE_UNITCD_CONVERSION must be defined for the project. If this is not defined you need to contact your system administrator.) - Categorical
- Text
- Flags (high, low, etc.)
- Modifier Value Constraints
- Numeric
- Date Constraint
3.2.3 Query Timing
Choose the relationship between the query panels. The default is independent.
Independent
The items (facts) can occur at any time in the patient's history.
Example Box title Example Patient has a medication with a dose greater than 500 mg and a medication that is taken once a day documented at any time in their history.
Same Financial Encounter
The items (facts) occur during the same visit (financial encounter).
- When this is selected, individual panels can be included in the "same encounter" query, or they can be treated independently.
| Example Box | ||
|---|---|---|
| ||
Patient has a diagnosis of Acute MI documented at any time in their history and they have a medication with a dose greater than 500 mg and a medication that is taken once a day documented during the same visit |
Temporal Query
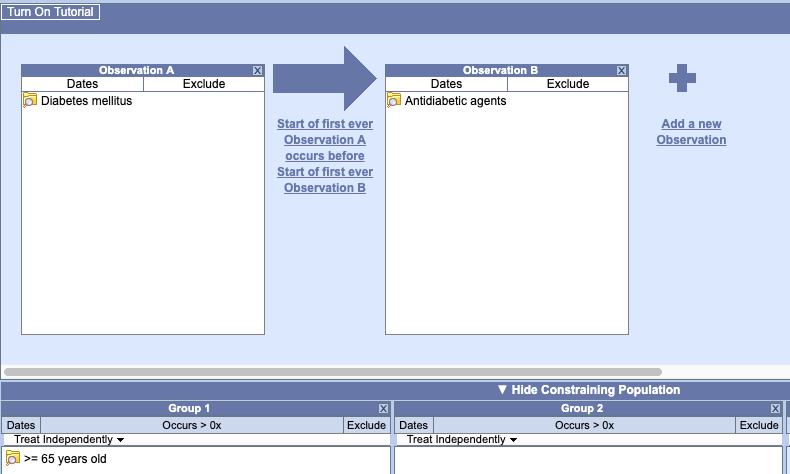
In this mode, a sequence of events are defined that are anchored by a constraining population. The constraining population is defined exactly like other query types. The process of building a sequence of events is explained by a a tutorial that is viewable by clicking 'Turn On Tutorial' in the upper-right corner of the query tool.
This example finds patients who were diagnosed with diabetes prior to the first observation of an antidiabetic medication (top panel). The population is constrained to patients over 64 years of age (bottom panel).
3.2.4 Reloading a Previous Query
Saved queries (either from Previous Queries or the Workplace) can be reloaded by dragging them to the Query Name bar at the top of the Query Tool. They can be used within a query by dragging them into a query panel. See the Previous Query section.
Left: reload a previous query. Right: Use a previous query within a new query.
3.2.5 Resetting the Query Tool
There are three options for resetting the Query Tool view. Users can (1) reset all the groups, (2) clear all items in a panel, or (3) delete an individual item from the group.
A. Reset All Groups: Click on the Clear button located on the toolbar at the bottom of the Query Tool view. |
B. Clear Items in a Panel / Group: Click on the Delete button () located in the top right corner of the panel (next to the Group name) |
C. Delete Single Item: Using the right mouse button, click on the name of the item to be removed and select Delete from the list. |
3.3 Running a Query
3.3.1 Run Query
Once the query criterion has been defined, the final steps are to click on the Run Query button, select the result type(s), and click on the OK button to run the query.
Once you have defined the search criteria click on the Run Query button located on the toolbar at the bottom of the Query Tool view. A new window will open.
- A name for the query will default at the query name field. Either change the name of the query or accept the default.
- In the query result type section, click on the checkboxes for those result types you want to include when the query is run.
- Click on the OK button.
- The Run Query window will close and the querying process will begin
Once you begin the process of running the query the Query Status view will display "Running Query", the name of the query, and the time that has elapsed.
3.3.2 Query Result Options
There are three categories of query type: counts, sets, and breakdowns. (Note that the Timeline type is not used in the Web Client. If selected it will work the same as patient set.)
1) Number of Patients
This option will return a total count for those patients who meet the defined criteria. This is the most common and fastest query type.
2) Patient/Encounter Set
These options return a set of patients or encounters that meet the defined criteria. The set is visible in the Previous Query view and can be used in future queries, the workspace, and by plugins.
Only information on the query's completion is shown in the Query Status panel.
4) Patient Breakdowns
The following query types will return patient counts stratified by the selected breakdown category (e.g., Gender or Age).
| Breakdown type |
|---|
| Gender patient breakdown |
| Vital Status patient breakdown |
| Race patient breakdown |
| Age patient breakdown |
| Length of Stay breakdown |
Top 20 Medications Breakdown |
Top 20 diagnoses Breakdown |
Inpatient and Outpatient Breakdown |
3.3.3. Query Status
When a query is running, the query status panel will show its status.
| Status | Meaning |
|---|---|
| Running | The query is currently running on the server and the client is waiting for results. |
| Finished | The query has completed. Results will be shown below this message. |
| Queued | The query took longer than the configured timeout. (Defaults to 180 seconds.) It is still running in the background and the results will appear in Previous Queries when it completes. |
| Error | An error occurred running the query. More information might be available in the XML Message Log. |


