...
| Section |
|---|
| Column |
|---|

|
| Column |
|---|
After searching for studies has been performed, the results are shown in a table. If "Append" has been selected, the results would be added to the existing table. If "Overwrite" has been selected, the results would overwrite the existing table. Additional buttons are also activated. - (Search Statistics) mi2b2 client reports how many studies are in the current table. The number of newly added studies found in the last search is listed in parentheses. Statistics of the MRNs or ANs submitted in the last search is also reported. Links are provided to view MRNs or ANs that are duplicates or are not found. Users can use the links to examine these MRNs and export them.
- (Selection ControlsManaging Table Contents) Users may can use the "Select All" and "Flip Selection" to select studies listed in the table. By default none of the studies are selected.
- (Toggle Filters) Users can toggle show/hide filter controls. Filter controls allow users to refine the results shown in the table. All filtering actions are performed on the client side exclusively.
- (Result Table) Results of the scout is shown in this table. Each row contains a patient. If more than one patient share the same MRN, then these patients show up as a single entry with an expandable button (see the patient with MRN = 4). Users can see all patients by clicking on the expand button. Users can sort by MRNs (cycling through ascending/descending/original order) by clicking on the MRN column header. However, this is the only column users can sort by.
- (Export Table Content) Users can export the entire content of the table or the selected rows by using these buttons. The content is exported to a text file (.txt).
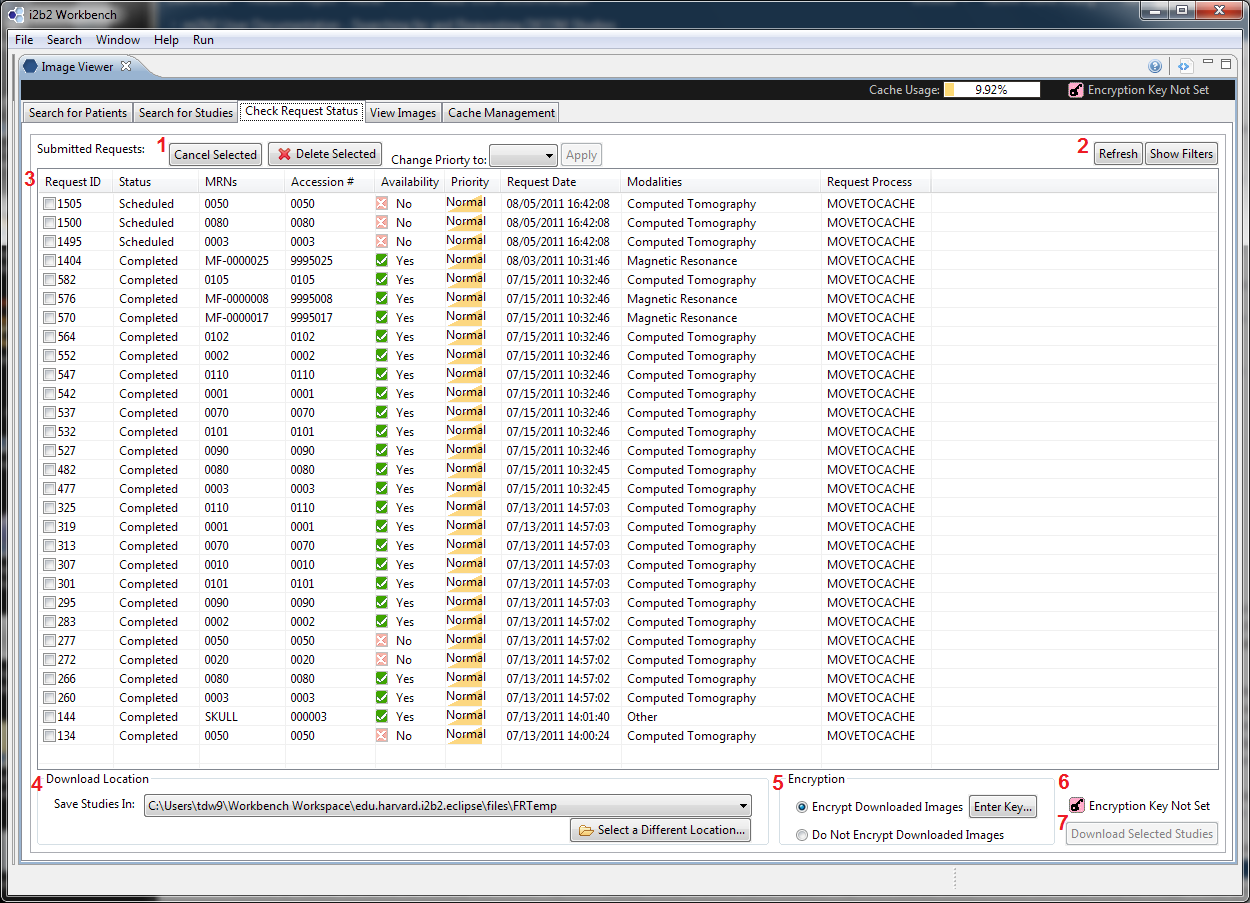
- (Request Selected Studies) After selecting the desired studies, users can click on this button to ask mi2b2 to obtain a copy of these studies and transfer them to the remote cache (on mi2b2 server). Clicking this button will transition users to Tab 3 (see below).Refresh" button to get the latest version of this table. Users can toggle the filter UI by using the "Show Filters" button.
- (Request Table) This table shows all the requests that have been submitted to the mi2b2 server.
- (Download Location) Users can select where to store the downloaded studies using the downdown box and the button to browse for a new location.
- (Encryption) Users can select whether to encrypt downloaded studies. The default value is to use encryption, however, if the download location conforms to the data safety and confidentiality policies outlined in each individual user's approved IRB, users may choose to not encrypt the downloaded studies. For encryption options and on how encryption is used, please see Encryption.
- (Encryption Indicator) This indicator shows whether a download action can be performed. When it is red, the download button is disabled. When it is green, the download button is enabled. The indicator will show green only if (1) Encryption is selected, and an encryption key is supplied, or (2) User oped to use no encryption.
- (Download Selected Studies) Users can select this button to download the selected studies to the download location using any encryption settings that has been specified.
|
|
View Request Status
Users are transitioned to Tab 3 after selecting "Request Selected Studies" from Tab 2 or by clicking on the tab directly. This tab allows users to view the progress of all submitted requests. Since this tab does not periodically check with the mi2b2 server for the latest statuses, users are encourage to visit this tab often or click on the "Refresh" button to get the most recent statuses.
...
Each request has a status (column 2). A request's status typically transitions from Scheduled to In Process to "Completed". When an error occurs, the status will be Error. Sometimes not all images in a study are retrievable from the PACS. When this occurs, the status is Incomplete (incomplete retrieval). Finally, after a request is canceled, the status is Canceled.
...
UI Layout
| Section |
|---|
| Column |
|---|
|
| Column |
|---|
- (Select an Institution) Users must first select an institution and an institution against whose PACS the search will be performed.Managing Requests) Users can cancel any ongoing requests using the "Cancel Selected" button. Canceled requests have the status Canceled. Users can also delete any requests using the "Delete Selected" button. By selecting a priority and click on "Apply", users can change the priority of requests to High/Normal/Low. Normal is the default priority.
- (Select a Department) Once an Institution is selected, the department dropdown box becomes active. The default value is "All Departments".
- (Clear ANs in the Text Area) Users can clear the values in the current text box by clicking on this button
- (Import ANs from a File) Users can import MRNs stored in a text file (.txt). The ANs must be comma- or newline- separated.
- (Find Studies with the ANs in the Text Area) Click this button to execute the search. This button is only activated when there are ANs in the text area and an institution and a department have been appropriately selected.
- (Append or Overwrite the Result Table) Users can designate whether the results of the next "Find Studies" action will append to the current result table, or overwrite it.
- (AN Text Area) This is the text area where users can enter ANs directly.
|
|