...
The information in this section will guide you through setting up Wildfly 10 17 to run as a Linux Service.
...
These are the basic steps that will be taken to set up the Linux Service.
| indent |
|---|
|
Step 1: Change Working Directory |
| indent |
|---|
|
Step 2: Copy Wildfly Init Directory |
| indent |
|---|
|
Step 3: Create a New Directory |
| indent |
|---|
|
Step 4: Copy Configuration File to the New Directory |
| indent |
|---|
|
Step 5: Edit Configuration File |
| indent |
|---|
|
Step 6: Start Wildfly and Verification |
...
Overview of Directories Involved in the Process
The following is an overview of the directories that will be used and referenced during the process of setting up JBoss to run as a service.
Directory | Description |
|---|
/etc | Standard Linux directory that contains the configuration files for the system. |
/etc/init.d | Standard Linux directory that contains the startup scripts for various system services.
These services are usually those that are to automatically start when the system is rebooted. |
/wildfly-1017.0.0.Final/bin/init.d | Wildfly directory that was created when Wildfly was installed.
It contains the configuration file and script to start Wildfly as a service. |
...
The first step is to log into the terminal and change your working directory to the init.d directory in your Wildfly directory. The init.d directory in your Wildfly directory contains the configuration file and script to start Wildfly.
Steps to Change Working Directory
...
...
| indent |
|---|
|
1. Open the terminal. |
| indent |
|---|
|
2. Enter the following command to change your directory to the int.d directory in your Wildfly directory. |
| Panel |
|---|
| borderColor | #ccc |
|---|
| bgColor | #ffffff |
|---|
| titleBGColor | #DDD9C3 |
|---|
| borderStyle | solid |
|---|
| title | Change Directory Command |
|---|
|
| indent |
|---|
| CD YOUR_WILDFLY_HOME_DIR/docs/contrib/scripts/init.d |
|
| indent |
|---|
|
Example: cd /opt/wildfly-10.0.0.Final/docs/contrib/scripts/init.d |
Step 2: Copy the Wildfly Init Directory
The second step in this process is to copy the Wildfly Control Script called wildfly-init-redhat.sh to the initialization directory on your Linux server. The wildfly-init-redhat.sh file contains the start and stop commands for the Wildfly Server and by copying it to your initialization directory the Wildfly server will be able to start automatically when the system is rebooted.
Steps to Copy jboss-as-standalone.sh File
Assumptions: you are still logged into the terminal and the working directory is /jboss-as-7.1.1.1.Final/bin/init.d
| indent |
|---|
|
1. Enter the following command to copy wildfly-init-redhat.sh file from the Wildfly directory. |
| Panel |
|---|
| borderColor | #ccc |
|---|
| bgColor | #ffffff |
|---|
| titleBGColor | #DDD9C3 |
|---|
| borderStyle | solid |
|---|
| title | Copy Command |
|---|
|
| indent |
|---|
| cp wildfly-init-redhat.sh /etc/init.d/wildfly |
|
| indent |
|---|
|
2. A copy of the file now resides in the standard /etc/init.d directory |
Step 3: Create a New Directory
The third step in this process is to create a new directory in the standard etc directory. This new directory will contain the configuration file for when the JBoss service is started.
Create Directory Steps
...
...
| indent |
|---|
|
1. Enter the following command to create a new directory called wildfly. |
| Panel |
|---|
| borderColor | #ccc |
|---|
| bgColor | #ffffff |
|---|
| titleBGColor | #DDD9C3 |
|---|
| borderStyle | solid |
|---|
| title | Create Directory Command |
|---|
|
| indent |
|---|
| mkdir /etc/default/wildfly |
|
| indent |
|---|
|
2. A new directory called wildfly now resides in the /etc directory. |
Step 4: Copy Configuration File to New Directory
The fourth step is to copy the configuration file called wildfly.conf to the directory you just created in the previous step. This file contains the general configuration for the init.d scripts.
Steps to Copy wildflyconf File
Assumptions: you are still logged into the terminal and the working directory is /wildfly-10.0.0.Final/docs/contrib/scripts/init.d
| indent |
|---|
|
1. Enter the following command to copy wildfly.conf file from your Wildfly directory. |
| Panel |
|---|
| borderColor | #ccc |
|---|
| bgColor | #ffffff |
|---|
| titleBGColor | #DDD9C3 |
|---|
| borderStyle | solid |
|---|
| title | Copy Command |
|---|
|
| indent |
|---|
| cp wildfly.conf /etc/defaults/widlfly |
|
| indent |
|---|
|
2. A copy of the file now resides in the standard /etc/defaults/wildfly directory |
Step 5: Edit Configuration File
The fifth step is to edit the JBOSS_USER in the jwildfly.conf file that you just copied to the wildfly directory in your etc directory. The JBoss user is the person who owns the process of stopping and starting the Wildfly server.
Steps to Update JBOSS_USER
...
...
| indent |
|---|
|
1. Enter the following command to open the wildfly.conf file in your /etc/defaults/wildfly directory. |
| Panel |
|---|
| borderColor | #ccc |
|---|
| bgColor | #ffffff |
|---|
| titleBGColor | #DDD9C3 |
|---|
| borderStyle | solid |
|---|
| title | Open Command |
|---|
|
| indent |
|---|
| open /etc/defaults/wildfly.conf |
|
| Note |
|---|
|
If you are connected to the server remotely then you will need to alter the above command to open it with a text editor. Instead of open you would type vi or whatever editor command is appropriate for your environment. Example: vi /etc/defaults/wildfly.conf |
| indent |
|---|
|
2. Edit the JBOSS_USER to the name of the wildfly user who is the owner of the process. |
| indent |
|---|
|
3. Save the changes and close the file. |
Step 6: Start Wildfly and Verification
The sixth and final step is to start Wildfly and verify it is running correctly.
| indent |
|---|
|
1. Enter the following command to start your Wildfly server. |
| Panel |
|---|
| borderColor | #ccc |
|---|
| bgColor | #ffffff |
|---|
| titleBGColor | #DDD9C3 |
|---|
| borderStyle | solid |
|---|
| title | Change Directory Command |
|---|
|
| indent |
|---|
| /etc/init.d/wildfly start |
|
| indent |
|---|
|
2. The Wildfly server will run the commands to start. |
| indent |
|---|
|
3. Once it has finished you can open a web browser and enter the following address: |
| indent |
|---|
|
4. The Wildfly Welcome page will display if your Wildfly server started correctly. |
| indent |
|---|
|
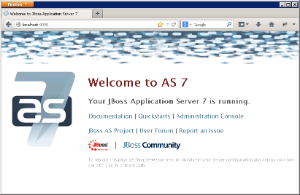 Image Modified Image Modified
|